Introduction
ViCANdo has an open SDK that allows the creation of custom interfaces, and also enables the use of the Algorithms under development as a high performance part of ViCANdo itself, executed with very high performance. Either by using the Matlab/Simulink (TM) Extension in ViCANSim or by utilizing the built in simulation engines for network simulation or video algorithm development following the widely accepted standard OpenCV.
This is the documentation of the ViCANdo SDK, which can be used to develop your own ADAS or other components.
ViCANdo can be found from this link.
Supported systems
Windows OS
Linux
Android
The functionality supported is platform specific. On Windows and Linux OS, most of the source types are supported.
Development tools
ViCANdo SDK is developed with Qt. It is recommended to have experience with QML, javascript and C/C++ when using the SDK.
On Windows OS, you will need below tools:
ViCANdo SDK for Windows OS option
Qt compiled by Zuragon - Windows version
Compiler: Microsoft Visual C++ compiler 15.x(can be fetched when downloading Visual Studio 2017)
On Linux/Ubuntu OS, you will need below tools:
On Android, you will need a development computer running either Windows/Linux/Mac OSX. You will need below tools:
ViCANdo SDK for Android option
Qt compiled by Zuragon - Windows or Linux/Ubuntu, depends on your own OS
Android SDK and NDK, can be downloaded via Android Studio
Jave JDK
Compiler: clang
Check * the getting started guide of Qt for Android for more information.

Notes:
SDK for Linux is available on both Ubuntu 18.04.x and 16.04.x.
Supporting openCV 4.4
SDK for Android option is limited, it is mainly used to access CAN data with J1939 protocol supported. You can create your own GUI to display the data. There is no video support yet, if you need access to the camera, try Vicandroid App instead.
Setup development environment
After all the needed tools are downloaded, it’s time to setup the development environment.
The steps are:
Install official Qt
Install Visual Studio 2017
Install Vicando and the license you have
Then under Qt’s installation directory, (e.g. C:\Qt on Windows OS), create a folder called 5.12. And copy the “Qt compiled by Zuragon” folder into it. We need to have both Qt installed under C:\Qt. The folder structure looks like this:
*C:\Qt\5.12.5\msvc2017_64 -> This is the installation path of the official Qt downloaded from their website.
*C:\Qt\5.12\msvc-2017-win32-zuragon-x64 -> This is the installation path of the Qt compiled by Zuragon.
Then the next step is to configure the kit in the Qt creator.
Open Qt Creator and go to Tools-> Options…:
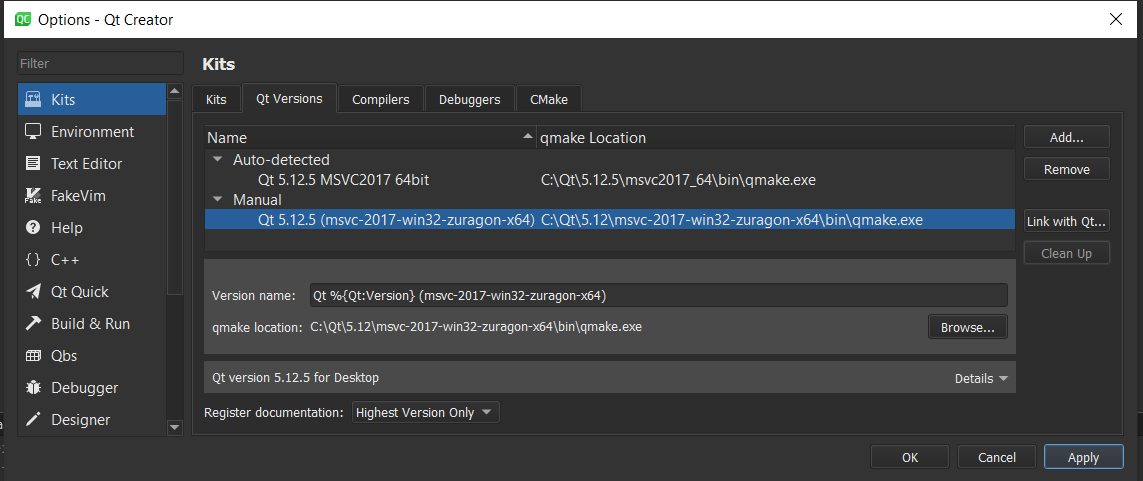
Then select “Kits”, click on tab “Qt Versions”, it iwl list the official one as auto detected kit. You will need to manuall add the qmake.exe in the Qt compied by Zuragon to here. The path to the qmake.exe on Windows is C:\Qt\5.12\msvc-2017-win32-zuragon-x64\bin\qmake.exe. Then click Apply.
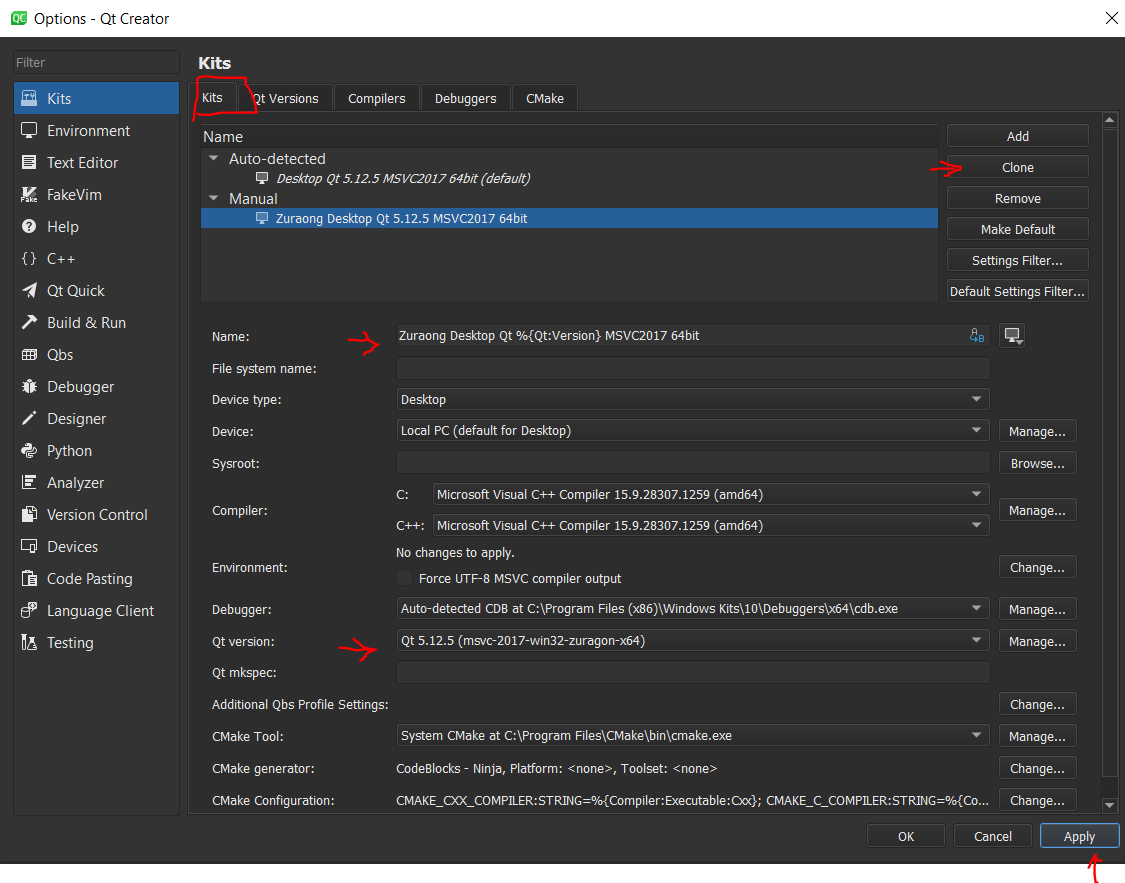
Then go back to the Kits tab, click on the Auto-detected kit and select Clone. Then give the cloned kit a name, for example: Zuraong Desktop Qt 5.12.5 MSVC2017 64bit and also select the Zuragon one in the Qt Versions dropdown box.
Then open the SDK example porject and configure the build & run kit for the project to use the Zuragon one.
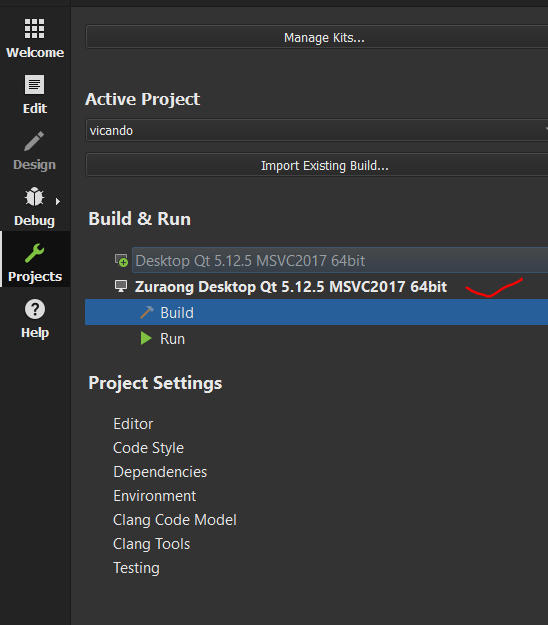
Then go to the Projects and select the build kit, disable the Qt quick compiler:

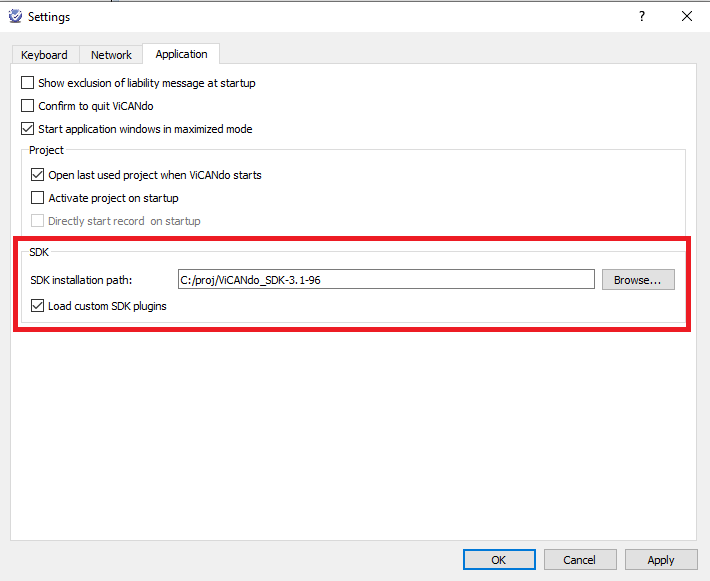
Debug and release compile the example project inside the SDK package, you will get the compiled module ( *.dll on Windows or *.so on Linux) in the ouput folder inside the SDK directory. Then in Vicando you can specify the SDK root folder in the File->Settings->Application tab to have Vicando load the plugin binaries in the output folder directly on start.
APIs
The typical usage of the SDK is:
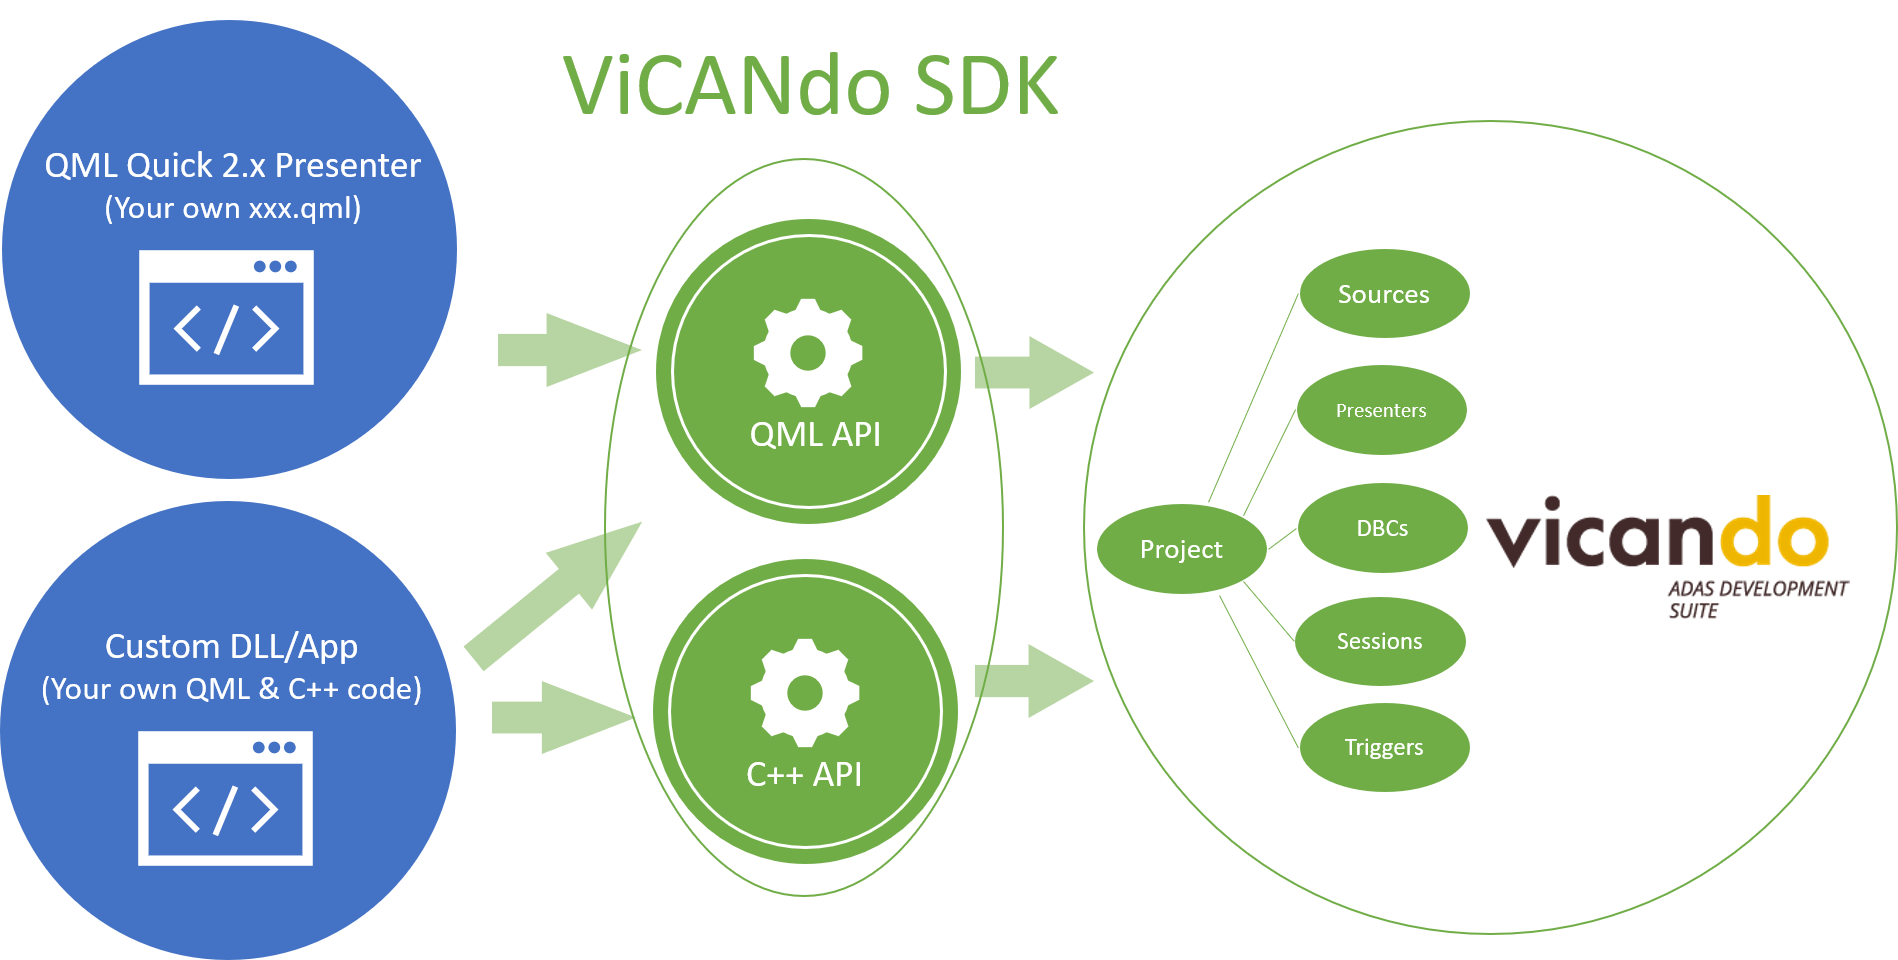
QML API allows you to write your own QML script using QML & Javascript languages and execute it in ViCANdo via menu Presentation->QML Quick 2.x Presenter.
SDK functions and QML API allows you to
Create your own application using C++/QML based on a ready made ViCANdo project. For example, the Simple J1939 application demo project.
Create your own customized presenter/viewer and execute it in ViCANdo. For example, create your own LiDAR presenter/viewer using the example under example/presenters folder. Then load the DLL in ViCANdo.
SDK architecture
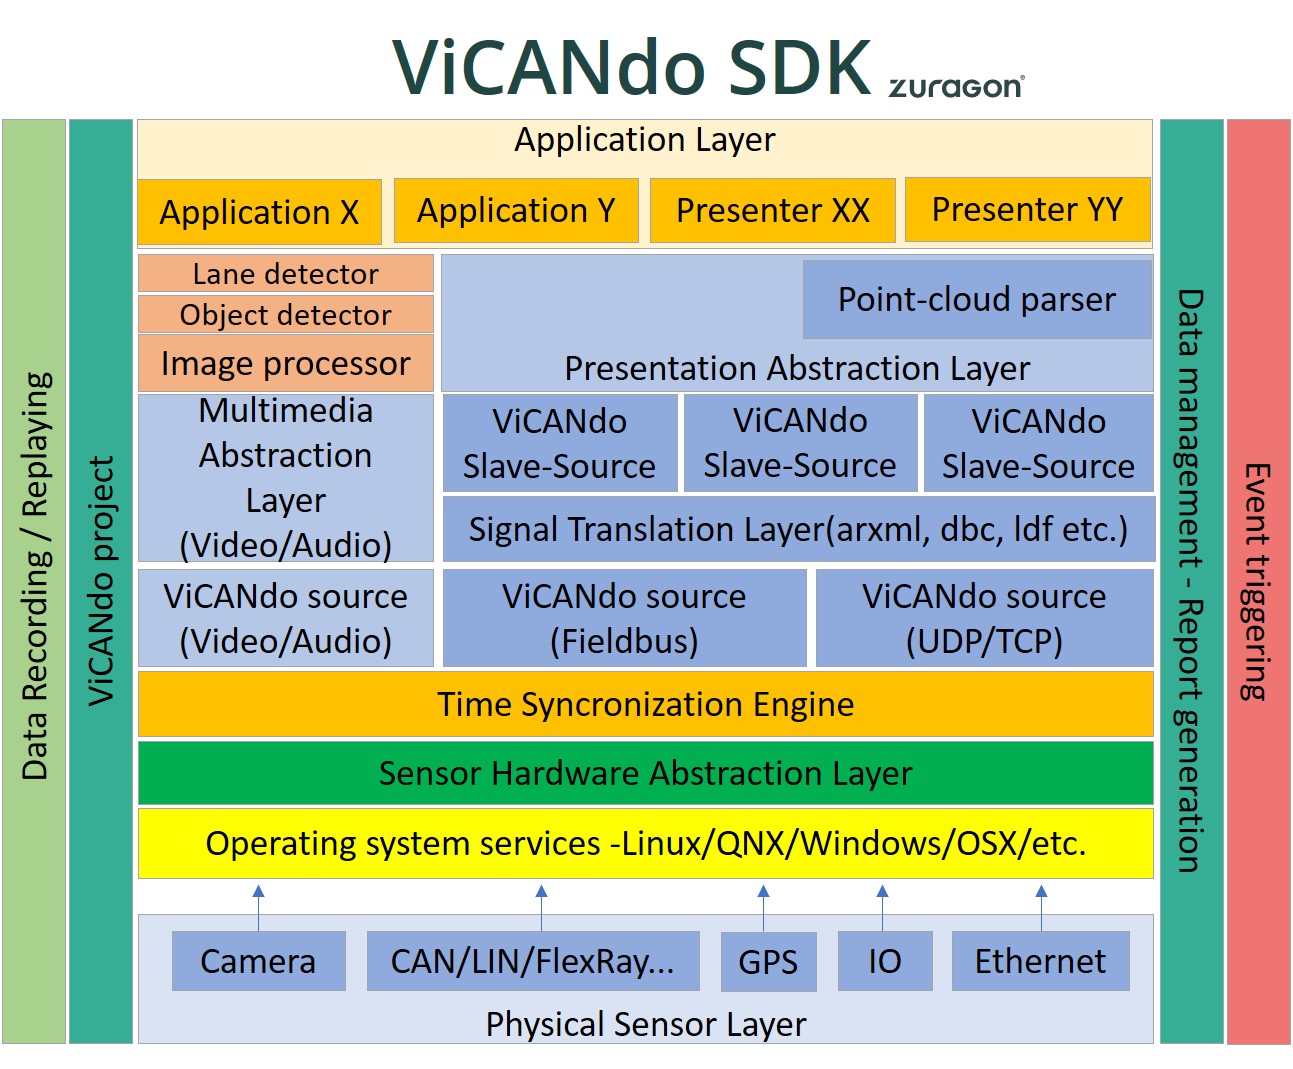
SDK package overview
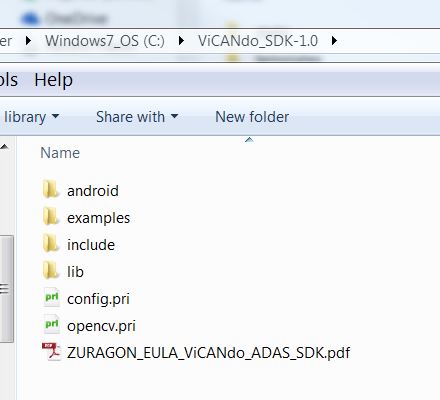
The files and folders are:
Folders or files |
Description |
|---|---|
android |
Contains the binary files of the SDK for both debug and release build on Android platform |
examples |
Contains source code of the examples. developed in Qt 5.12.x |
include |
Contains header files of the SDK |
lib |
Contains the binary files of the SDK for both debug and release build |
config.pri |
Global configuration file of the SDK |
opencv.pri |
Global openCV configuration file of the SDK |
ZURAGON_EULA_ViCANdo_ADAS_SDK.pdf |
SDK end user license agreement |
Note:
It is recommended to store the SDK in a directory without space on Windows OS. e.g. C:\proj\
The examples are:
demoapp - An application that accessing CAN interface and send messages using SDK runtime without Vicando running in the front end.
image_processors:
blur_image_filter - An example developed based on the “image pre processor API”, it shows you how to alter the video frame and save the processed video frame into the Vicando project and disk. This API can be used to develope e.g. human face, license plate masking plugins. In vicando, when the plugin is loaded successfuly, it will show as a sub menu of “image processors” when you right clicking on the video source.
lane_detector - A simple Overlay example, developed based on the “image processor API”. When the plugin is loaded successfuly, it will show as a sub menu on the video presentation. The objects drawed on the video frame will not be saved into the session.
vehicle_detector - Similar to the lane_detector example. It is a simple Overlay example shows you how to detect vehicles.
presenters:
customlidar - A lidar presenter example shows you how to create your own lidar presenter using the lidar API in the SDK.
customvideo - A video presenter example shows you how to create a presenter that displays 4 videos from 4 video source in one window. You have the freedom to draw any objects on the presenter. This example is best for advanced user who wants to develop advanced video processing plugins since you need to write the render code by yourself. For users who want to develope simple image processing plugins, use the “image processor API”, check the lane detector and vehicle detector examples.
helloworldpresenter - A simple presenter shows you how to develop a plugin GUI using QML and exchange data with C++ side.
other lidar presenter examples - Show you how other lidar presenters are implemented.
Compile and execute the example plugin
To run the example plugins from the SDK, you need to first release build the example project and configure to load the binary plugin in ViCANdo from menu File->Settings->Application:
Notes:
To develop the plugin, you need the SDK package.
To run the plugin, you need to have "SDK Windows runtime option" or "SDK Linux runtime option" in your license file.
Load and run the plugin without SDK installed
When you want to execute the developed plugin on a computer without SDK installed, it is recommended to copy the whole “output” folder from the machine where have developed the plugin with SDK and paste the output folder to a directory( without space on Windows OS), and specify that directory in the menu File->Settings->Application->SDK installation path.
The reason for this is that under the output folder, the binary of the plugins based on different API are located under different type of folder, For example, image processor based plugins are located under “output\release\plugins\imgproc” folder, presenter plugins are located under “output\release\plugins\presenters” folder.