2. Application notes
This chapter collects few application tips that help you to setup the project.
2.1 Take new version into use
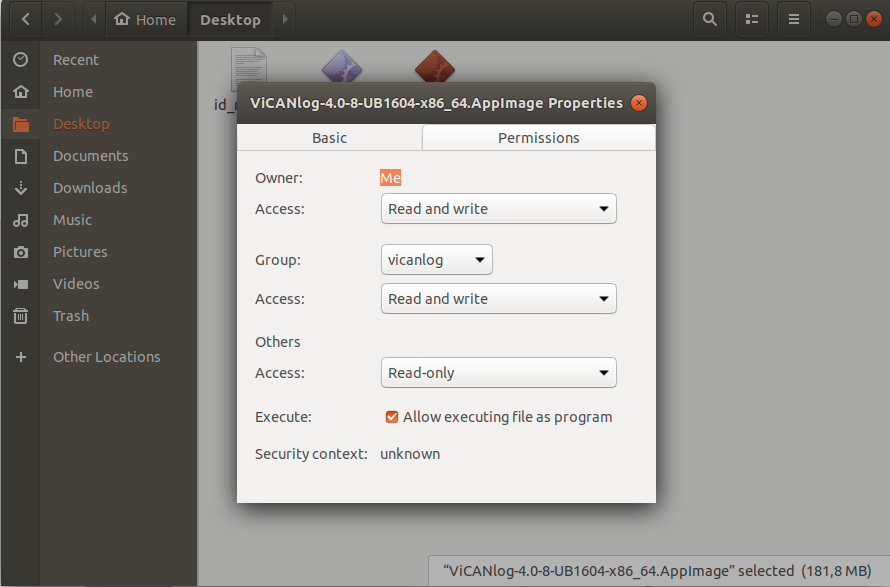
Download the new version and place it on Desktop. Set the appImage property to “Allow executing files as program”:
Configure the SW to run at system boot. Search “start up” and select start up application. Click Add to add vicanlog appImage to below window:

2.2 Project configuration
Typically you want to configure the vicanlog unit to record data continously on power up. It requires you to configure the software run on power on, configure vicanlog to activate the project when the software opens, configure auto-recording when the project is activated. Below image shows the example of the configuration:
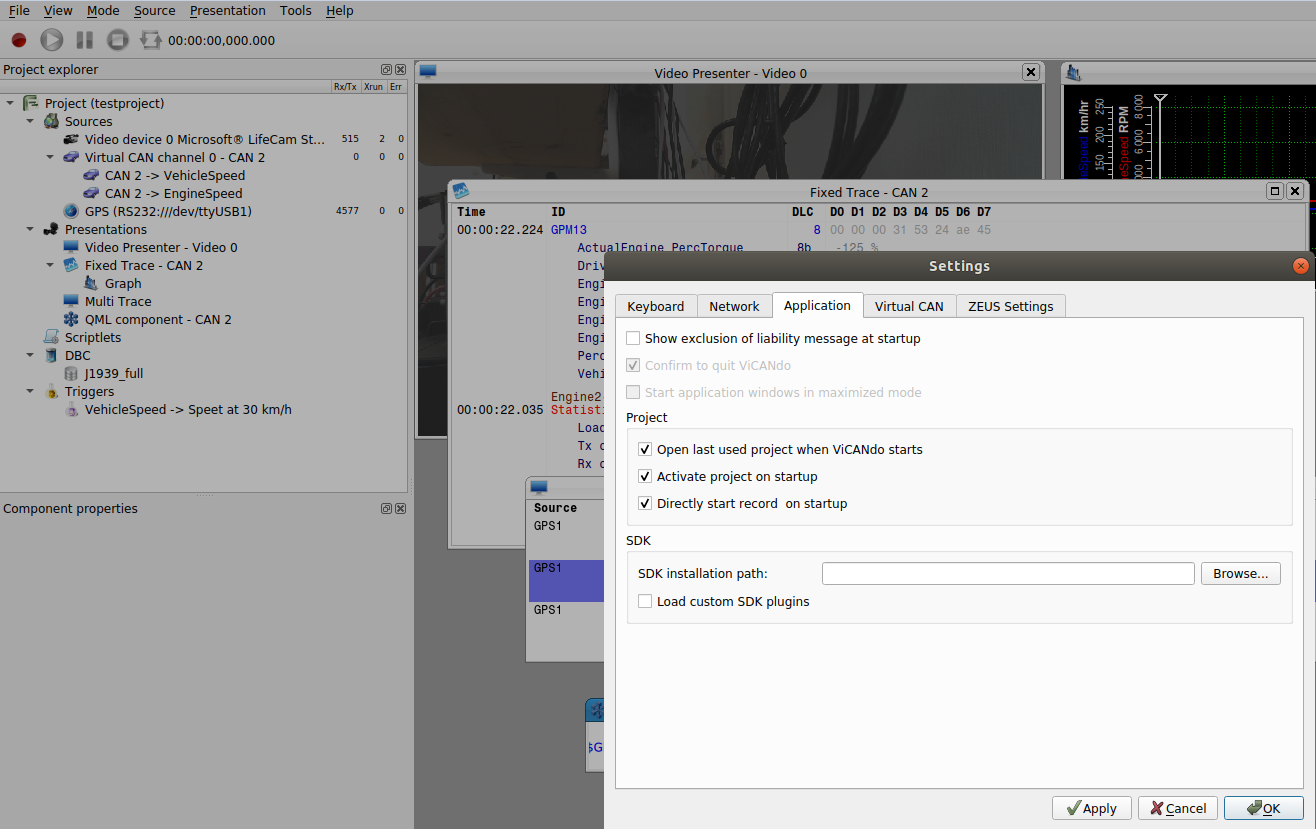
It is recommended to hide the exclusion of liability window at startup, open last used project and activate, start recording on start up.
2.3 Zeus settings
The secured connection between Vicanlog unit and Zeus is as follows:
Heartbeat and status information are HTTPS requests to zeus server.
Heartbeat( the status of vicanlog unit) will be sent out to zeus every second. When the project is in idle state, heartbeat will be sent every 15 seconds.
Data storage is using rsync service over SSH.
It can be configured to upload the session to zeus after the recording of that session is finished, or by manually right-click on the project to upload.
The remote connection is using the SSH tunnel.
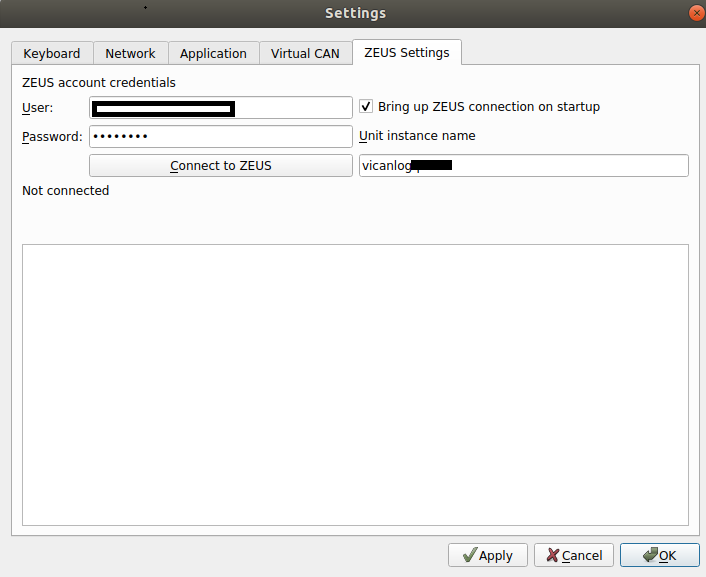
If you want to bring up zeus connection on start up you need to configure it in File->Settings-> Zeus Settings tab:
The bottom area is for console output. For example:
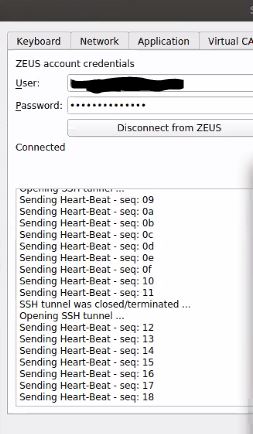
This is the place to see if ZEUS connection is ok or not.
Troubleshooting
If the connection to ZEUS is not working, open a terminal and type in below command:
ssh vicanlog-pxxx@www.zuragon.com echo Hello
where xxx in the vicanlog-pxxx is the instance name we(Zuragon) configured for your unit.
It will print Hello if ZEUS connection is ok.
If it doesn’t print Hello, please send us the SSH public key for further investigation. To copy the SSH public key, open the terminal and try below command:
cat .ssh/id_rsa.pub
Please note that once the SSH key was genearted and configured, please do not re-generate the SSH key, this will overwrite the old key and break the connection between vicanlog and ZEUS server.
Another important thing to remember is that the SSH connection requires port 22. If you are using the corporate office network, you need to ask your IT department to un-block the port 22. If you are using the mobile network, usually port 22 is unblocked.
For data synchronization via SSH tunnel to ZEUS, you can configure to synchronize/upload the session after the recording of that session is finished in the “component properties window” when you click on the project:

Above screenshot is the typical configuration of a continous recording project, it will record the data into multiple sessions with a length of 10 seconds.
You can also manually synchronize with ZEUS if you right click on the project.
Login to ZEUS web interface
The link to login the web interface of the ZEUS: https://www.zuragon.com/zeus/ On ZEUS you can download the logs that was uploaded and also view the heatbeat status(GPS, project state etc.).
2.4 Built-in GPS settings
If the built-in GPS module(Quectel EC25 mini PCIe) is used, the Quectel EC25 mini PCIe and the antenna, the Vicanlog PC comes with GPS pre-configured to auto-start at system boot.
Please note that for better communication with the satalites, you need to place the antenna close to the window or outdoors for lab testing to get a fix.
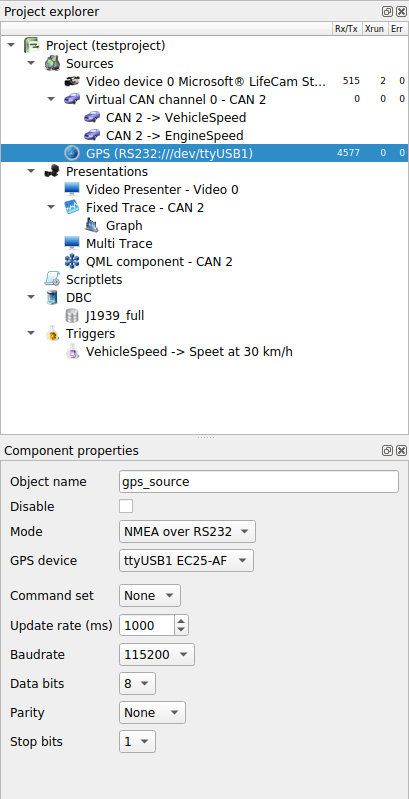
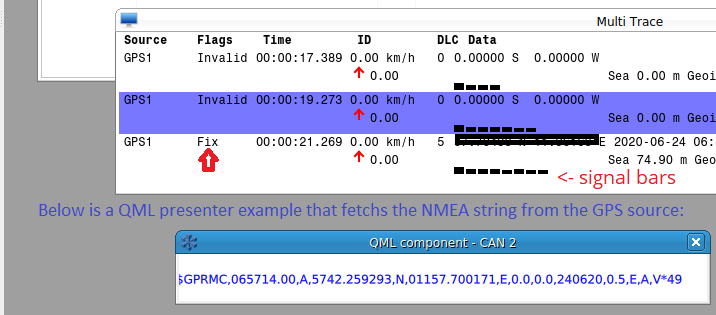
Add a multi trace for the GPS source.
If there is no or poor connection to the satalites, in the multi trace the received message will have invlaid flag.
If the connection is OK, the multi trace will show Fix flag and signal bars.
2.5 Using LiDAR sensors
It is recommended to use the “UDP socket” Source in the server mode for capturing lidar data. Read more from vicando manual.
It is recommended to add a multi trace for viewing the lidar data. If needed add a lidar viewer for the configured lidar source during the setup process of the project. Once the logging project is configured, keep the lidar viewer window closed since rendering point cloud data consumes lots of resources. For post-analysing using Vicando at the office, it is OK to view the lidar viewer. But for logging purpose only on the Vicanlog, it is recommended to close the lidar viewer windows. It will help a lot if you are trying to capturing data for e.g. 6 or 8 lidars simutanancely.
2.6 Video settings
It is recommended to use the H.264 encoder with a fixed bitrate for video sources. As for the other properties, you are free to adjust and find out the best setting for your camera. For example, below is the settings for a network camera:
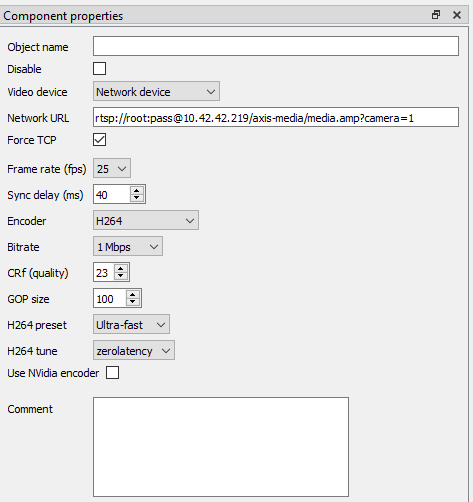
Usually network camera has less delay compared to USB 2.0 cameras.
If you are capturing more than 4 videos simutanancely, it is recommended to close the video presentation window for continous logging since rendering the video consumes lots of resources. It is OK to open the video presentation window while setting up the project. Once the project is configured to continously logging automatically at boot, it’s better to close or hide the video presentation window to save resources.
2.7 Using with Zeno 42x CANquatro
Refer to the user manual of CANquatro for more information.
2.8 Using with Kvaser device
Follow the guide from Kvaser: https://www.kvaser.com/canlib-webhelp/page_installing.html#section_install_linux to compile and install&load the driver for Kvaser devices.
Please note that if you are doing “sudo apt-get update” afterwards, you need to re-compile and install the kvaser driver. Otherwise it will be not loaded.