QML API
ViCANdo can be extended with custom functionaly in the form of QML presenters. To use a QML component in ViCANdo, from the Presentation menu select Quick 2.x Presenter, for example:
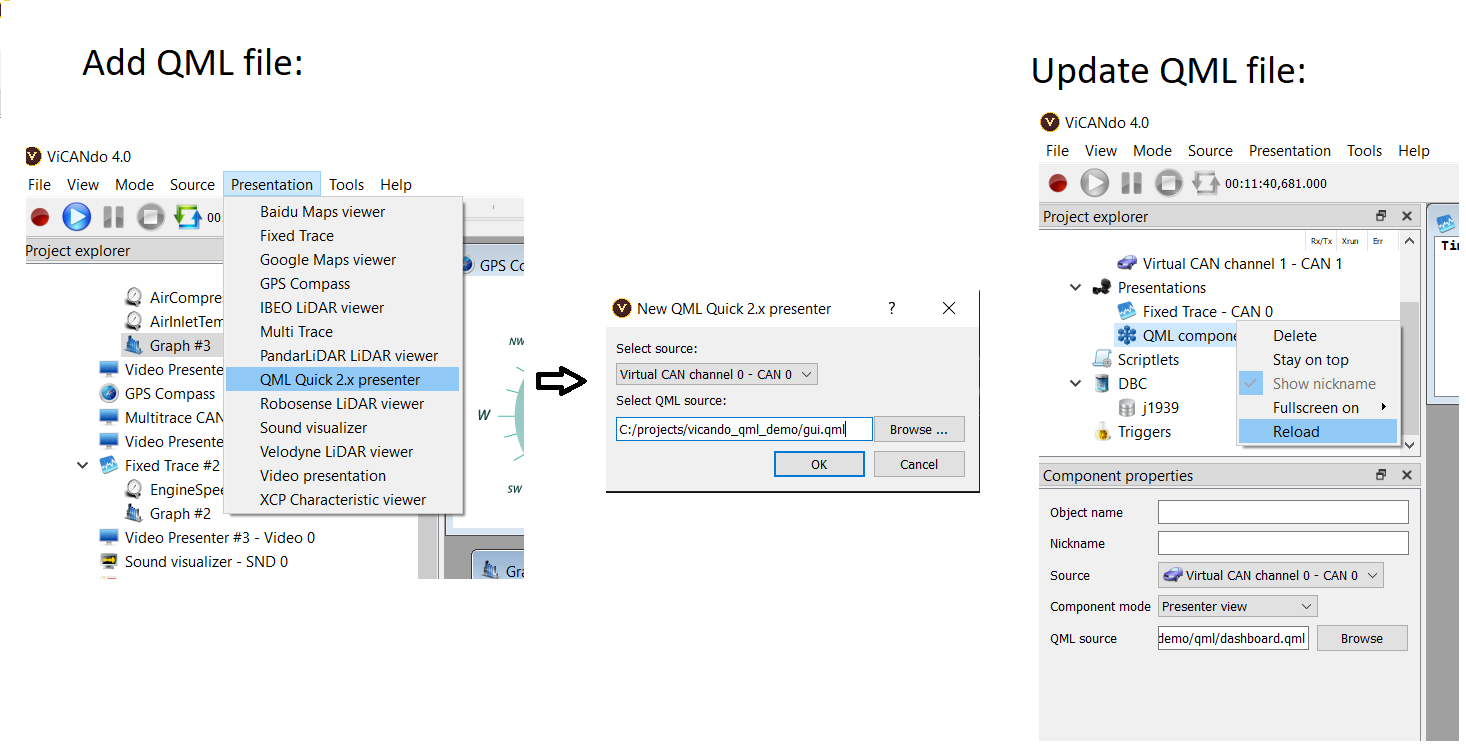
If your QML file is updated after added to the ViCANdo project, you will need to right click on the QML component and select Reload to use the updated version.
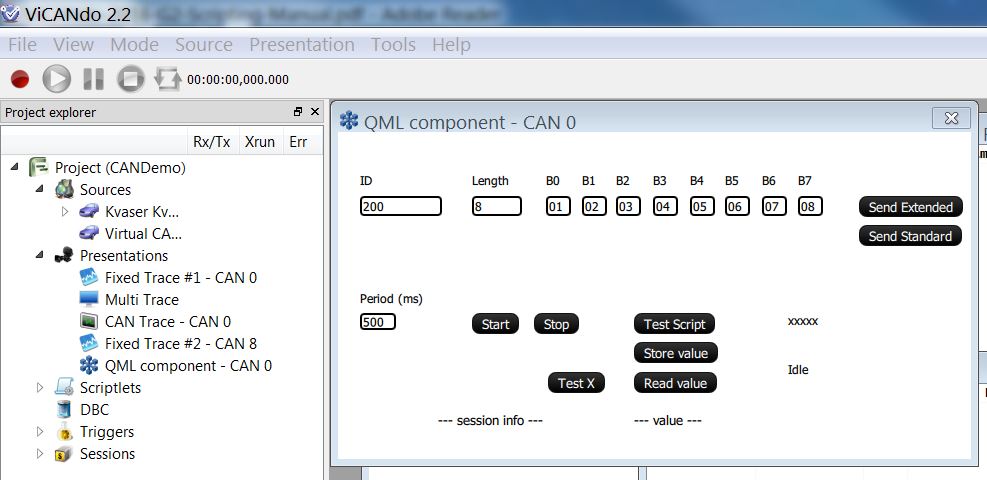
For example, below screen shot shows a customized QML script that can be executed in ViCANdo to transmit CAN messages.
Note
It is recommended to store the QML script under the root folder of the ViCANdo project. e.g. under qml/ folder.
About QML
QML (Qt Meta Language or Qt Modelling Language) is a JavaScript-based, declarative language for designing user interface–centric applications. It is part of Qt Quick, the UI creation kit developed by Nokia within the Qt framework. QML is mainly used for mobile applications where touch input, fluid animations (60 FPS) and user experience are crucial. QML documents describe an object tree of elements. QML elements shipped with Qt are a sophisticated set of building blocks, graphical (e.g., rectangle, image) and behavioral (e.g., state, transition, animation). These elements can be combined to build components ranging in complexity from simple buttons and sliders, to complete internet-enabled programs.
QML elements can be augmented by standard JavaScript both inline and via included .js files. Elements can also be seamlessly integrated and extended by C++ components using the Qt framework.
Read more about QML from Qt
A simple QML example that just displays Hello World with white text on a black background:
import QtQuick 2.5

Rectangle {
 color: "#000000"
 width: 100; height: 100
 Text {
         color: "#FFFFFF"
         anchors.fill: parent
         horizontalAlignment : Text.AlignHCenter
         verticalAlignment : Text.AlignVCenter
         text: "Hello World"
 }
}
This section lists the QML API functions you can use to write your own QML script. If you have purchased ViCANdo SDK, there are example applications that show you how to use the QML API to develop your own QML application. Contact Zuragon or your local Zuragon distributor for more informaiton.
Basic QML elements
Name |
Description |
|---|---|
Item |
The item is the most basic of all visual items in QML. Refer to Item |
Rectangle |
The Rectangle items provides a filled rectangle with an optical border. Refer to Rectangle |
Image |
The Image elements displays an image in a declarative user interface. Refer to Image |
Text |
The text item allows you to add formatted text to a scene. Refer to Text |
TextInput |
The TextInput item displays an editable line of text. Refer to TextInput |
TextEdit |
The TextEdit item displays multiple lines of editable formatted text. Refer to TextEdit |
FocusScope |
The FocusScope object explicitly creates a focus scope. Refer to FocusScope |
Component |
The component element encapsulates a QML component definition. Refer to Component |
MouseArea |
The MouseArea item enables simple mouse handling. Refer to MouseArea |
Timer |
The Timer item triggers a handler at a specified interval. Refer to Timer |
Context properties
main_source
This property provides the main source attached to the Quick 2.x presenter. When you add a QML Quick 2.x Presenter in ViCANdo, you need to select the source to attach. This source can be accessed in QML using main_source property.
self
This property provides a reference to its own Quick 2.x presenter object.
Methods
Prototype |
Description |
|---|---|
self.logMessage(string message) |
Log a text message to the project console in ViCANdo |
self.log(string message) |
Same as logMessage method |
self.forceReload() |
Force reload of the QML component |
project
This property is the main property. It gives you access to the project in ViCANdo. All the resources such as sources, triggers, Databases, sessions etc. can be accessed via this property.
By using the methods below you can also start/stop/pause the recording, or replaying back the current selected session. This is useful if you want to control the logging based on signal values/events from QML API. e.g. if one CAN signal’s value is bigger than expected, you can start the recording to make a log for configured minutes if you have configured the maximum logging time when right click on the project in ViCANdo.
Example using the project property in QML script:
import QtQuick 2.5

Text {
 width: 100; height: 100
 horizontalAlignment : Text.AlignHCenter
 verticalAlignment : Text.AlignVCenter
 text: "Click on me"
 MouseArea {
         anchors.fill: parent
         onClicked: {
                project.logMessage("Clicked on " + mouseX + "," + mouseY);
 }
 }
}
Properties
Name |
Description |
|---|---|
source |
Array of sources avaliable in the project. For example, project.source(0) returns the first source in the source list. |
presenter |
Array of presenters available in the project |
scriptlet |
Array of Scriptlet available in the project |
trigger |
Array of triggers available in the project |
dbc |
Array of DBCs available in the project |
projectDirectory |
Absolute path to the location of the current project |
currentSession |
Current selected session object, null if no session is selected |
isLivePlayback |
True if ViCANdo is live playing back the selected session |
allSessions |
Array of all sessions in the project |
trafficGenerator |
Use the Traffic Generator(under menu Tools) to send DBC messages |
Methods
Prints a text message in the project console window in ViCANdo:
-
logMessage(string message)¶ - Arguments
message (string) – The text message to be logged to the project console in ViCANdo.
Prints a text message in the project console window in ViCANdo:
-
log(string message)¶ - Arguments
message (string) – The text message to be logged to the project console in ViCANdo.
Get a reference to scriptlet matching name:
-
scriptlet(string name)¶ - Arguments
name (string) – The name of the scriptlet
- Returns object
The scriptlet object
Run a scriptlet:
-
runScriptlet(string name)¶ - Arguments
name (string) – The name of the scriptlet
Get a reference to a project component, used to access the componnet:
-
findObject(string object_name)¶ - Arguments
object_name (string) – The Object name of the resource in ViCANdo project. Can be set in Component properties pane in ViCANdo.
Clear the ViCANdo text console:
-
clearConsole()
Store a value within the project:
-
storeValue(String key, value, persistent)¶ - Arguments
key (string) – The index to the vlaue stored
value – The value to be stored. Only string values can be permanently stored.
persistent (bool) – If persistent is true, the value will be permanently stored within the project. Otherwise, the value will be permanent until the project is closed or the script engine is restarted.
Remove a stored value:
-
removeValue(string key)¶ - Arguments
key (string) – The index to the vlaue to be removed
Retrieve a stored value from the list:
-
value(string key)¶ - Arguments
key (string) – The index to the vlaue in the stored value list
- Returns
The value retrieved
Remove all stored values:
-
clearStoredValues()
Activate the project( Must be in Idle state to activate):
-
activate()
Start recording after project is activated:
-
startRecord()
Stop the recording:
-
stop()
Pause the recording or replaying:
-
pause()
Replay the current selected session:
-
play()
Read a text file:
-
readTextFile(string file_name)¶ - Arguments
file_name (string) – The path and the name of the text file to be read
- Returns
The contents of the text file as a string. On failure, error message is printed on the console window in ViCANdo.
Write a text file:
-
writeTextFile(string output_file_name, string text_to_write)¶ - Arguments
output_file_name (string) – The path and the name of the file you want to write/create.
text_to_write (string) – The text you want to write to the file.
- Returns
Nothing. On failure, error message is printed on the console window in ViCANdo.
Append text to a text file:
-
appendToTextFile(string file_name, string text_to_append)¶ - Arguments
file_name (string) – The path and the name of the file you want to append the text to.
text_to_append (string) – The text you want to append to the end of the file.
- Returns
Nothing. On failure, error message is printed on the console window in ViCANdo.
Download ViCANdo example project to learn how to use above functions to read and write text file. The QML script is under qml folder inside the archive.
Generate a HTML document based on the template:
-
generateDocument(string template_file, string output_file, stringList replace_list)¶ - Arguments
template_file (string) – The template HTML file with place holders for the values you want to fill
output_file (string) – The output HTML file with values you have filled
replace_list (stringList) – List of value you want to replace in the template file with real variables you want to fill
Returns a QUrl representation of local file, interpreted as a local file:
-
urlFromLocalFile(string local_file)¶ - Arguments
local_file (string) – The name of the local file
- To open the generated file, you can do:
Qt.openUrlExternally(project.urlFromLocalFile(local_file))
Below is a simple template file test_report_example.html example:
<html>
<head>
<title>Module Test Report</title>
<link rel="stylesheet" href="report.css"/>
<meta charset="UTF-8">
</head>
<body bgcolor="#ffffff">
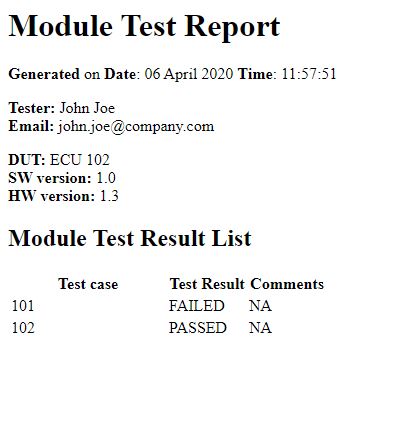
<h1>Module Test Report</h1>
<p><b>Generated</b> on <b>Date</b>: <<<CURRENT-DATE>>> <b>Time</b>: <<<CURRENT-TIME>>></p>
<p><b>Tester:</b> John Joe<br>
<b>Email:</b> john.joe@company.com</p>
<p><b>DUT:</b> ECU 102<br>
<b>SW version:</b> 1.0<br>
<b>HW version:</b> 1.3</p>
<h2>Module Test Result List</h2>
<table>
<tr>
<th style="width:50%">Test case</th>
<th style="width:25%">Test Result</th>
<th style="width:25%">Comments</th>
</tr>
<<<TEST-RESULT-LIST>>>
</table>
</body>
</html>
<<<CURRENT-DATE>>> is the syntax of the variable you want to replace with the value list.
HTML styling file report.css:
body {
        font-family:Arial;
        margin-left:5%;
}

h2 {
        background: #B0B0B0;
        margin-right:20%;
        left: 10pt;
        padding: 2pt;
        padding-left: 12pt;
}

table {
        width: 80%;
        margin-right:20%;
        border-spacing: 0;
        text-align: left;
}

th {
        padding-left: 12pt;
        background: #D2D2D2;
        font-size:16pt;
}

td {
        padding-left: 12pt;
        font-size:15pt;
        background: #E0E0E0
}
To generate a new HTML document based on above example template file:
    // Headers:
    import QtQuick 2.12
    import com.zuragon.ViCANdo 1.0
    import QtQuick.Controls 1.4
    import QtQuick.Layouts 1.12

    // ...

    // Create a row in the table
function makeHTMLRow(o)
{
    var r = "<tr>"
    r += "<td>" + o.testCaseNo + "</td>"  // Fill in the test case number of the input object
    r += "<td>" + getTestResultText(o.testResult) + "</td>"  // Fill in the test result string of the input object
    r += "<td>" + "NA" + "</td>"
    r += "</tr>"
    return r;
}


    // generate a HTML document based on the template file and value list to replace the place holders
function generateReport(){
    var value_list = []

    var current_date = new Date()
    value_list.push("<<<CURRENT-DATE>>>", current_date.toLocaleDateString())
    value_list.push("<<<CURRENT-TIME>>>", current_date.toLocaleTimeString())

    var test_result_list = ""
    for(var i = 0; i < GL.test_cases.length; i++){
        var row = GL.test_cases[i];
        test_result_list += makeHTMLRow(row);
    }
    value_list.push("<<<TEST-RESULT-LIST>>>")
    value_list.push(test_result_list)

    var out_file = project.generateDocument("report/test_report_template.html", "test_report.html",
                             value_list
                            )

    if ( out_file != "" ) {
        project.log("Test report: " + out_file)
        Qt.openUrlExternally(project.urlFromLocalFile(out_file))
    }

}
The generated HTML file looks like this:
source
Source[] provides an array of all sources available in project. Is mainly just an alias to project.source[]
Methods
Abailable on all kind of sources.
Prints a text message in the project console window in ViCANdo:
-
logMessage(string message)¶ - Arguments
message (string) – The text message to be logged to the project console in ViCANdo.
The methods you can access from the source is source-specific.
Session
The properties and methods of a session in the project are as follows:
project.currentSession: This property provides access to the currently selected session.
project.allSessions: This property returns the array of all sessions in the project.
Properties
Name |
Description |
|---|---|
sessionName |
Session name. For example: Tue Sep 25 18:53:38 2018 -> 00:00:01.82 |
sessionSubDirectory |
The name of the directory of the session folder |
displayName |
The Name text field in the Component properties window of the session |
nickName |
The Name text field in the Component properties window of the session |
displayNameText |
The name of the session in the session tree view. for example: session-102 |
commentText |
The Comment text field in the Component properties window of the session |
startDateTime |
Session record start date and time |
utcStartDateTime |
The UTC timestamp when the session record started |
startDateTimeUSecs |
The micro-seconds of the session record start time. Value range from 0 to 999999 us |
timeInUs |
Current play/record position in micro-seconds |
timeInMs |
Current play/record position in milli-seconds |
startTimeOffsetInUs |
Start time offset of the session in micro-seconds, > 0 in case the session has been cropped |
endTimeInUs |
End time of the session in micro-seconds |
cropped |
True if the session has been “cropped”(soft crop, the original session is still kept) |
cloned |
True if this session was cloned from another session. |
recording |
True if this session is under recording now. |
bookmarkList |
The list of bookmarks of the session. Each bookmark contains timestamp and comment text |
logDataFileList |
The list of log files of the session. |
Methods
It is possible to use below methods to crop/clone a session which is not under replaying or recording. This is most useful to cut only part of the interesting clips from a big session file based on the e.g. bookmarks with special syntax. The basic steps are:
Define the trigger that will set a bookmark for cutting the session. for example, “CropStart_bookmark_1000rpm” will be set when the RPM reaches 1000 and “CropEnd_bookmark_3000rpm” will be set when the RPM reachs 3000.
Record a session including both triggers get hot.
Find the ression from QML API: project.allSessions or if project is in idle state, select the session you want to cut and use project.currentSession
Use session.bookmarkList to find the bookmark pairs based on the prefix “CropStart_” and “CropEnd_”
Use session.cropSession(start_crop_time_us, end_crop_time_us) to crop the session. The desired start/end crop time can be configured. Just need to make sure the time is within the start and stop time fo the session.
Use session.cloneSession() to make the new session clip from the original session and add the new clip to project’s session list.
Use session.resetCrop() after the cloning is done.
Crop a session between desired timestamps:
-
cropSession(start_crop_time_us, end_crop_time_us)¶ - Arguments
start_crop_time_us (int) – The timestamp in us to start cropping the session.
end_crop_time_us (int) – The timestamp in us to end cropping the session.
Returns the name of the new session clip, which is cloned from original session. for example: new_session_name = session.cloneSession()
-
cloneSession()
Reset the crop on the session after the cloning is done.
-
resetCrop()
Example to retrieve the name of the session and the folder name of the session directory on a button click:
    Button {
    id: test_current_session
    x: 30
    text: qsTr("Display current session name")
    onClicked: {
        var session_name = project.currentSession.sessionName
                    // Example to use the session name as part of the file name:
                    var new_file_name = session_name.replace(" -> ", "__").replace(/:\s*/g,"_") + ".log"

                    // Get the directory of the session folder. For example: session_20180928_115008
                    var session_dir = project.currentSession.sessionSubDirectory
    }
}
Example to loop through the bookmark list of the session:
for( var i = 0, len = session.bookmarkList.length; i < len; i++){
var bm_str = session.bookmarkList[i];
var bm_str_splited = bm_str.split(":");

var bm_timestamp = bm_str_splited[0];   // Get the timestamp of the bookmark
var bm_comment = bm_str_splited[1];     // Get the comment of the bookmark
}
trafficGenerator
By using project.trafficGenerator you can transmit DBC messages or the DBC messages configured in Tools->Traffic generator. You need to have a DBC file configured in ViCANdo to work with. The DBC file should be attached to the source(for example CAN channel, or CAN FD channel) you want to send from.
Properties
Name |
Description |
|---|---|
started |
True if the Traffic Generator is started |
visible |
True if the Traffic Generator window is displayed |
messages |
List of messages configured in Traffic Generator |
Methods
Start or stop the periodic transmission of input message:
-
startStop(message)¶ - Arguments
message (<DBC_message_object>) – The message object from the database file
Start or stop periodic transmission of all messages:
-
startStopAll()
Send a message once:
-
send(message)¶ - Arguments
message (<DBC_message_object>) – The message object from the database file
Send all configured messages once:
-
sendAll(void)
Add one DBC message to the Traffic Generator if it’s not there(You only need to do this once):
-
addMessage(message)¶ - Arguments
message (<DBC_message_object>) – The message object from the database file
Return TRUE if the message is already added to the Traffic Generator message tree:
-
hasMessage(message)¶ - Arguments
message (<DBC_message_object>) – The message object from the database file
Remove one DBC message from the Traffic Generator:
-
removeMessage(message)¶ - Arguments
message (<DBC_message_object>) – The message object from the database file
Get the transmission interval in ms of the message:
-
getSendInterval(message)¶ - Arguments
message (<DBC_message_object>) – The message object from the database file
Set the transmission interval in ms for the message:
-
setSendInterval(message, int interval)¶ - Arguments
message (<DBC_message_object>) – The message object from the database file
interval (int) – The time interval in ms to transmit this message
Set the value of the signal:
-
setSignalValue(signal, double value)¶ - Arguments
signal (<DBC_signal_object>) – The signal object from the database file
value (double) – The value to set for this signal
Get the value of the signal:
-
getSignalValue(signal)¶ - Arguments
signal (<DBC_signal_object>) – The signal object from the database file
Slots
There are few slots from the Traffic Generator to keep track of changes of the state, check below example code to learn how to use it.
QML Traffic Generator example:
import QtQuick 2.5
import QtQuick.Controls 2.3
import com.zuragon.ViCANdo 1.0

Rectangle {
        width: 600
        height: 600
        color: "#7A8692"

        property var dbc: project.dbc[0]
        property var sendTool: project.trafficGenerator  // Get the handle to the Traffic Generator

        property var txMsg: sel.dbc.getMessageByName("MESSAGE2_1");  // Get the message object
        property var sigObj: txMsg.getSignalByName("Signal2_1_2"); // Get a signal of the message

        property var okToSend: false;

        Label {
                id: label

                anchors.left: parent.left
                anchors.top: parent.top

                anchors.margins: 10
                color: "white"
                text: "Send DBC message from QML using Traffic Generator"
        }

        SourceEventListener {
                id: sel
                source: project.source[0]
                dbc: project.dbc[0]
                filter: ["MESSAGE1_1"]
                onMessageReceived: {

                        // On reception of MESSAGE1_1, change the signal value and transmit MESSAGE2_1
                        project.log("***Rx " + message.name);
                        // Print all the signals of this message
                        message.signals.forEach(function(sig) {
                                project.log("signal " + sig.name + ": " + sig.value + " " + sig.unit + "\n");
                        });

                        // Example to send a message using Traffic Generator
                        var sigVal = getRandomInt(20);
                        sendTool.setSignalValue(sigObj, sigVal);  // Set a value to this signal
                        if( okToSend){
                                sendTool.send(txMsg); // Send the message
                        }
                        project.log("***Tx " + txMsg.name + " signal " + sigObj.name + " : " + sigObj.value)

                        // Note:  Since MESSAGE1_1 will be sent from Traffic Generator on reception of "MESSAGE1_1", therefore above code will transmit MESSAGE2_1 periodically.
                        //        If you want to send the message somewhere else, need to configure the time interval(usually only do this once). e.g. sendTool.setSendInterval(txMsg, 300); which will transmit txMsg every 300 ms.
                }
        }

        function getRandomInt(max) {
                return Math.floor(Math.random() * Math.floor(max));
        }

        // Below example shows you how to use the signals when something changed
        Connections {
                target: sendTool

                onSendIntervalChanged: {
                        // message object and interval are available here
                        project.log(" message: " + message.name + " interval " + interval);
                }

                onSignalValueChanged: {
                        // signal object and value are available here
                        project.log(" signal: " + signal.name + " value " + value);
                }

                onMessageSendingStarted: {
                        // message object and boolean started are available here
                        project.log(" message: " + message.name + " is started to send ? " + started);
                }
        }

        Component.onCompleted: {
                sendTool.addMessage(txMsg); // Add the message to the Traffic Generator message tree

        }
        ProjectStateEventListener{
                id: project_state_listener
                onIdle: {
                        project.log("Project Idle " + time_in_us)
                        okToSend = false;
                }
                onPreparing: {
                        project.log("Project Preparing " + time_in_us)  // Openning all the channels
                }
                onArmed: {
                        project.log("Project Armed " + time_in_us)
                        }
                onRecording: {
                        project.log("Project Recording " + time_in_us)
                         okToSend = true;
                }
                onPlaying: {
                        project.log("Project Playing " + time_in_us)
                }
                onRecordBreak: {
                // If the project is configured to record continously into new session, each session has a maximum record time. This event will be triggered at the time when the project is
                // spliting into a new session.
         }
        }

}
UDP/TCP Source specific
It is possible to send and receive data through UDP/TCP sources with QML API. TCP source and UDP source have the same API. Below is a list of functions of the UDP source:
Methods
Send a TCP package:
-
send(byte[] data)¶ - Arguments
data (byte[]) – Array of data to be sent. The format is: [b0, b1, b2, b3, b4, b5, b6, b7]
For example:
var tcp0 = project.findObject("tcp0")
var d = [1,2,3,4,5,6,7,8,9]
tcp0.send(d)
Send a UDP package:
-
send(byte[] data)¶ - Arguments
data (byte[]) – Array of data to be sent. The format is: [b0, b1, b2, b3, b4, b5, b6, b7]
For example:
var udp0 = project.findObject("udp0")
var d = [1,2,3,4,5,6,7,8,9]
udp0.send(d)
Send a UDP package to a host:
-
send(byte[] data, string host_address, string host_port)¶ - Arguments
data (byte[]) – Array of data to be sent. The format is: [b0, b1, b2, b3, b4, b5, b6, b7]
host_address (string) – The address of the receiver. e.g. “localhost”, “192.168.10.3”
host_port (string) – The port number of the receiver.
For example:
var udp1 = project.findObject("udp1")
var d = [11,22,33,44,55,66,77,88,99]
udp1.send(d, host_address, host_port)
More example about how to send and receive data via UDP source can be found in UDP to CAN demo project. More example about how to send data via TCP source can be found in TCP socket demo project.
RS232 Source specific
Methods
Send data from RS232 source:
-
send(byte[] data)¶ - Arguments
data (byte[]) – Array of data to be sent. The format is: [b0, b1, b2, b3, b4, b5, b6, b7]
Send text from RS232 source:
-
sendText(string text)¶ - Arguments
text (string) – The text to be sent.
For example:
var com0 = project.findObject("com0")
var d = [1,2,3,4,5,6,7,8]
com0.send(d)

var text = "Hello from com0"
com0.sendText(text)
More example about how to send and receive data via RS232 source can be found in UDP to CAN demo project
GPS Source specific
Properties
Name |
Description |
|---|---|
updateRate |
Update rate in milli-seconds GPS events are dispatched, changing this property will set the GPS device update rate, and the source internal update rate |
minimalUpdateRate |
Minimal update rate in milli-seconds that data events are dispatched. Data events will not be dispatched with lower time interval then what’s set on this property. |
deviceUpdateRate |
The GPS device update rate. When setting this property a proprietary vendor specific NMEA command will sent to the GPS device. |
Methods
Send a NMEA sentence to the GPS device, the starting $ and checksum, and CR LF at the end of the line is automatically added:
-
sendNMEA(string nmea_line)¶ - Arguments
nmea_line (string) – The NMEA sentence to be sent.
Send a NMEA sentence. The starting $ and checksum is not added, CR LF is added at the end of the line before sent to the device:
-
sendRawNMEA(string raw_nmea_line)¶ - Arguments
nmea_line (string) – The NMEA sentence to be sent.
Example that sends NMEA sentence on mouse click:
import QtQuick 2.5

Text {
         width: 100; height: 100
         horizontalAlignment : Text.AlignHCenter
         verticalAlignment : Text.AlignVCenter
         text: "Click on me to send a NMEA sentence on main_source"
         MouseArea {
                 anchors.fill: parent
                 onClicked: {
                         /* PMTK command that will set the update rate to 500ms */
                         main_source.sendNMEA("PMTK220,500")
            }
        }
}
Matlab Specific
Methods
Restart Matlab engine:
-
restart()
Evaluate Matlab command:
-
evaluate(const QString& command)¶ - Arguments
command – The Matlab command to be evaluated
Define a variable in Matlab, the data is from a buffer:
-
putVariable(const QString& name, QObject* data)¶ - Arguments
name – The pointer for the Matlab variable name
data – The pointer to the data for the variable name
Define a variable in Matlab, the data is of type double:
-
putVariable(const QString& name, double v)¶ - Arguments
name – The pointer for the Matlab variable name
v – The data of the variable name, of type double
Convert array of data to image:
-
arrayToImage(const QString& name)¶ - Arguments
name – The Matlab variable name
Convert array of data to variable:
-
arrayToVar(const QString& name)¶ - Arguments
name – The Matlab variable name
Evaluate a file:
-
evaluateFile(const QString& __local_file)¶ - Arguments
__local_file – The file path and name to be evaluated
CAN Source specific
Properties
Name |
Description |
|---|---|
deviceName |
The name of the device. e.g. Kvaser Virtual #0 (Channel 0) |
bitrate |
The bitrate of this CAN source. Unit is bps. e.g. 1000000 |
Methods
Send a CAN frame, extended ID is default:
-
send(uint id, byte[] data)¶ - Arguments
id (uint) – The identifier of the CAN frame
data (byte[]) – Array of CAN frame data. The format is: [b0, b1, b2, b3, b4, b5, b6, b7]
Send an extended CAN frame:
-
sendExtended(int id, byte[] data)¶ - Arguments
id (int) – The identifier of the CAN frame
data (byte[]) – Array of CAN frame data. The format is: [b0, b1, b2, b3, b4, b5, b6, b7]
Send a standard CAN frame:
-
sendStandard(int id, byte[] data)¶ - Arguments
id (int) – The identifier of the CAN frame
data (byte[]) – Array of CAN frame data. The format is: [b0, b1, b2, b3, b4, b5, b6, b7]
Send a remote CAN frame, default is extended:
-
sendRemote(int id, byte[] data)¶ - Arguments
id (int) – The identifier of the CAN frame
data (byte[]) – Array of CAN frame data. The format is: [b0, b1, b2, b3, b4, b5, b6, b7]
Send a standard remote CAN frame:
-
sendStandardRemote(int id, byte[] data)¶ - Arguments
id (int) – The identifier of the CAN frame
data (byte[]) – Array of CAN frame data. The format is: [b0, b1, b2, b3, b4, b5, b6, b7]
Send an extended remote CAN frame:
-
sendExtendedRemote(int id, byte[] data)¶ - Arguments
id (int) – The identifier of the CAN frame
data (byte[]) – Array of CAN frame data. The format is: [b0, b1, b2, b3, b4, b5, b6, b7]
Example that sends a CAN frame on mouse click:
import QtQuick 2.5

Text {
         width: 100; height: 100
         horizontalAlignment : Text.AlignHCenter
         verticalAlignment : Text.AlignVCenter
         text: "Click on me to send a CAN frame on source[0]"
         MouseArea {
                 anchors.fill: parent
                 onClicked: {
                        source[0].send(100, [1,2,3,4,5,6,7,8]);
                 }
         }
}
CAN FD Source specific
Properties
Name |
Description |
|---|---|
deviceName |
The name of the device. e.g. Kvaser Virtual #0 (Channel 0) |
arbitrationBitrate |
The arbitration bitrate of this CAN FD source. Unit is bps. e.g. 1000000 |
dataBitrate |
The data bitrate of this CAN FD source. Unit is bps. e.g. 2000000 |
Methods
Send a CAN FD frame, extended ID is the default:
-
send(uint id, byte[] data)¶ - Arguments
id (uint) – The identifier of the CAN FD frame
data (byte[]) – Array of CAN FD frame data. The format is: [b0, b1, b2, b3, b4, b5, b6, b7]
Send an extended CAN FD frame:
-
sendExtended(int id, byte[] data)¶ - Arguments
id (int) – The identifier of the CAN FD frame
data (byte[]) – Array of CAN FD frame data. The format is: [b0, b1, b2, b3, b4, b5, b6, b7]
Send a standard CAN FD frame:
-
sendStandard(int id, byte[] data)¶ - Arguments
id (int) – The identifier of the CAN FD frame
data (byte[]) – Array of CAN frame data. The format is: [b0, b1, b2, b3, b4, b5, b6, b7]
DBC Source specific
project.dbc[] array contains list of DBC files used in ViCANdo project. For each DBC file, by using below method, you can explore the content of the DBC file. Get list of messages, signals, network nodes. etc. Typically used together with a SourceEventListener.
You can use either the object name you have configured for your DBC file in Component properties window in ViCANdo to access the dbc object. For example, project.findObject(“my_j1939_dbc”) contains the dbc object of the DBC file with Object name set to my_j1939_dbc. Or use the array: project.dbc[0] if you want to get the first DBC file in ViCANdo project.
Properties
Name |
Description |
|---|---|
dbcFilePath |
The file path of the DBC file. e.g. C:/projects/vicando_project/mydbc.dbc |
messages |
List of the messages in the DBC file, same as <dbc object>.getMessages() |
nodes |
List of network nodes in the DBC file. same as <dbc object>.getNodes() |
e.g. project.dbc[0].messages contains the list of messages in the first DBC file in the array. project.dbc[0].getMessageById(0x123).signals contains the list of signals of the message with Id 0x123 in the first DBC file in the array.
Methods
Returns the list of nodes from the database file:
-
getNodes()
Returns the node object matching the name from the database file:
-
getNodeByName(string name)¶ - Arguments
name (string) – The name of the node in DBC file
Returns all the messages from the DBC file:
-
getMessages()
e.g. project.dbc[0].getMessages() returns the list of the messages in the first DBC file in ViCANdo.
Returns the list of messages sent by the sender node from the DBC file:
-
getMessagesBySender(sender_node_object)¶ - Arguments
sender_node_object (<node_object>) – The sender node object of the message
Returns the wanted message matching the id from the DBC file:
-
getMessageById(ulong id)¶ - Arguments
id (ulong) – The identifier of the CAN frame
Returns the wanted message matching the name from the DBC file:
-
getMessageByName(string name)¶ - Arguments
name (string) – The name of the message
Message object contains below properties:
Name |
Description |
|---|---|
name |
The name of the message |
id |
The id of the message |
size |
The size of the message |
sender |
The sender node of the message |
receiver |
The receiver node of the message |
signals |
List of the signals of the message, same as <message object>.getSignals() |
The next is to get the properties of all the signals of a message in the DBC:
Returns list of the signals of the message:
-
getSignals()
Returns the signal in the message by the index of the signal:
-
getSignalByIndex(int index)¶ - Arguments
index (int) – The index of the signal in the message
Returns the wanted signal matching the name in the message:
-
getSignalByName(string name)¶ - Arguments
name (string) – The name of the signal
Signal object contains below properties:
Name |
Description |
|---|---|
name |
The name of the signal |
combinedName |
Both message name and signal name. Format: <messageName>.<signalName> |
startBit |
The start bit of the signal |
length |
How many bits the signal uses |
isLittleEndian |
True if it’s little endian |
isSigned |
True if signal is signed |
factor |
The factor for the signal in the database |
offset |
The offset of the signal |
decimalCount |
How many decimals of the value of the signal |
minimum |
The minimum value of the signal |
maximum |
The maximum value of the signal |
unit |
The unit of the signal |
hasUnit |
True if the signal has a unit |
value |
The calculated physical value by applying the linear formula from the database |
rawValue |
The raw value of the signal |
hasValueDescriptions |
True if this signal has a value table in the database |
valueDescriptions |
A list of all entrys in the value table for this signal in the database |
valueDescription |
The symbolic value according to the value table in the database. |
Check out the examples of SourceEventListener to learn how to use the messages, signals in QML API.
Example of iterates the value table of a signal in SourceEventListener:
if (sig.hasValueDescriptions) {
    var descriptions = sig.valueDescriptions;
    var txt = "Value descriptions:\n";
    for (var key in descriptions) {
        if (descriptions.hasOwnProperty(key)) {
            txt +=  "   " + key + " -> " + descriptions[key] + "\n";
        }
    }
    // Prints the current signal's name, value and description
    txt += "Signal: " + sig.name + " Value: " + sig.value + " Description: " + sig.valueDescription + "\n";
    console.log(txt);
}
Components
This chapter describes the ViCANdo QML components that can be used for accessing the data from the specific type of source in ViCANdo.
SourceEventListener
Use this component to catch data events from a source. The data to be received has different format depending on the type of the source. e.g. If it’s a CAN source, the CAN frame can be fetched.
Together with a database file and a Fixed Trace, it is possible to set the filter on the incomming messages based on the database file.
Properties
Name |
Description |
|---|---|
source |
The source to receive data events from, use main_source or source[0…n] |
filter |
To only receive the filtered messages. Available in Fixed Trace with a DBC attached |
dbc |
The DBC file to be used |
The filter array contains either message names as strings or message objects. for example:
filter: ["MESSAGE1_1", "MESSAGE2_1"]
filter: [project.dbc[0].getMessageById(257)]
filter: [project.dbc[0].getMessageByName("MESSAGE2_2"), project.dbc[0].getMessageByName("MESSAGE3_1")]
filter: project.dbc[0].messages
filter: [dbc.getMessageById(513)]
filter: [dbc.getMessageByName("MESSAGE2_2"), dbc.getMessageByName("MESSAGE3_1")]
Slots
onDataReceived This slot contains data which is the incomming data of the source. It has different type of property for different type of source.
onFrameDataReceived This slot is mainly used for CAN source with DBC attached. It contains the raw data and also supports fetching the value of the message and signal from the DBC file.
onFilterChanged This slot is used when the filter property of the SourceEventListener is changed.
onMessageReceived This slot is for CAN source with DBC attached. It contains the message object from where you can access all the signals of that message from DBC file.
Check below examples to learn how to use above properties and slots.
Example 1: Catch data events from a CAN Source:
import QtQuick 2.5
import com.zuragon.ViCANdo 1.0

Text {
         id: root_item
         color: "#0000FF"
         width: 500; height: 50
         horizontalAlignment : Text.AlignHCenter
         verticalAlignment : Text.AlignVCenter
         text: "No data received yet"

         SourceEventListener{
                 source: main_source
                 onDataReceived: {
                         root_item.text = "CAN frame received time " + data.time + " ID " + data.id + " flags " + data.flags + " data " + data.data;
                         }
         }
}
If you have a Fixed Trace in ViCANdo and would like to use the DBC file to retrieve signals and messages from the received data event, you can configure the SourceEventListener like below example.
Example 2: Catch data events from a J1939 transport protocol Source:
SourceEventListener {
                id: listen_to_j1939_msg
                source: project.findObject("j1939_can0")  // The J1939 transport protocol Source in the ViCANdo project. Its Object name is j1939_can0
                dbc: project.findObject("my_j1939_dbc")  //The database file that was attached to the Fixed Trace. Its Object name is my_j1939_dbc
                filter: ["EEC1","EBC2","GPM14"]  // Configure the messages you want to receive for this SourceEventListener
                onFrameDataReceived: {

                 project.log("Rx: " + name  + "  time: " + _data.time + " ID: " + _data.id + " data: " + _data.data)

                 //Handling the received signals
                 if( name == "EEC1"){
                        //Do something with the signals, e.g. access the value of the signal "EngSpeed" in DBC file by: data["EngSpeed"]
                 }
                 if( name == "EBC2"){
                        //Do something with the signals, e.g. access the value of the signal "FrontAxleSpeed" in DBC file by: data["FrontAxleSpeed"]
                 }
                 if(name == "GPM14"){
                        //Do something with the signals, e.g. access the value of the signal "CurrentGear" in DBC file by: data["CurrentGear"]
                 }

                }
}
There is also another way to receive from a specific signal by creating a “slave-source”.
Example 3: Catch data events from a J1939 transport protocol Source using “slave-source”:
import QtQuick 2.5
import com.zuragon.ViCANdo 1.0

Item {
        id: app_engine
        visible: true

        signal rpm1Data(real value)
        signal engOilPressureData(real value)

        Component.onCompleted: {
                project.log("App engine loaded")
                var fixed = project.findObject("fixed")
                if ( fixed === null ) {
                        project.log("ERROR: there must be a Fixed Trace with Object name 'fixed'")
                        return;
                }

                fixed.requestSlaveSource("rpm_s",              "EEC1.EngSpeed")
                fixed.requestSlaveSource("eng_oil_pressure_s", "[Engine1]EFL_P1.EngOilPress")


                sel_rpm_s.source              = project.findObject("rpm_s")
                sel_eng_oil_pressure_s.source = project.findObject("eng_oil_pressure_s")
        }

        SourceEventListener {
                id: sel_rpm_s

                onDataReceived: {
                        rpm1Data(data.value)
                }
        }

        SourceEventListener {
                id: sel_eng_oil_pressure_s

                onDataReceived: {
                        engOilPressureData(data.value)
                }
        }

}
It has one SourceEventListener for every expected J1939 signal which makes the code easier to debug. For example, fixed.requestSlaveSource(“rpm_s”,”EEC1.EngSpeed”) creates a “slave-source” object: rpm_s, which is then assgined to the SourceEventListener sel_rpm_s by sel_rpm_s.source = project.findObject(“rpm_s”)
The slave-source is created only by demand and is not saved to the ViCANdo project. Everytime fixed.requestSlaveSource() is called, you will see a new Source popup in ViCANdo.
Example 4: Access messages, signals, nodes from the DBC file when an incoming message came:
SourceEventListener {
    source: project.source[0]
    dbc: project.dbc[0]

    // These different ways of providing the filter all work:
    //filter: ["MESSAGE1_1", "MESSAGE2_1"]

    //filter: [project.dbc[0].getMessageById(257)]
    //filter: [project.dbc[0].getMessageByName("MESSAGE2_2"), project.dbc[0].getMessageByName("MESSAGE3_1")]
    //filter: project.dbc[0].messages

    //filter: [dbc.getMessageById(513)]
    //filter: [dbc.getMessageByName("MESSAGE2_2"), dbc.getMessageByName("MESSAGE3_1")]

    filter: [messageList.currentMessage]
    onFilterChanged: currentMessageInfo.text = ""

    // Listening for only one message: messageList.currentMessage
    onMessageReceived: {
        var txt = "Listening for " + messageList.currentMessage.name + ":\n\n";
        if (message === messageList.currentMessage) {
            message.signals.forEach(function(sig) {
                txt += sig.name + ": " + sig.value + " " + sig.unit + "\n";
            });
        }
        currentMessageInfo.text = txt;
    }
}
There is an example project for Example 4:
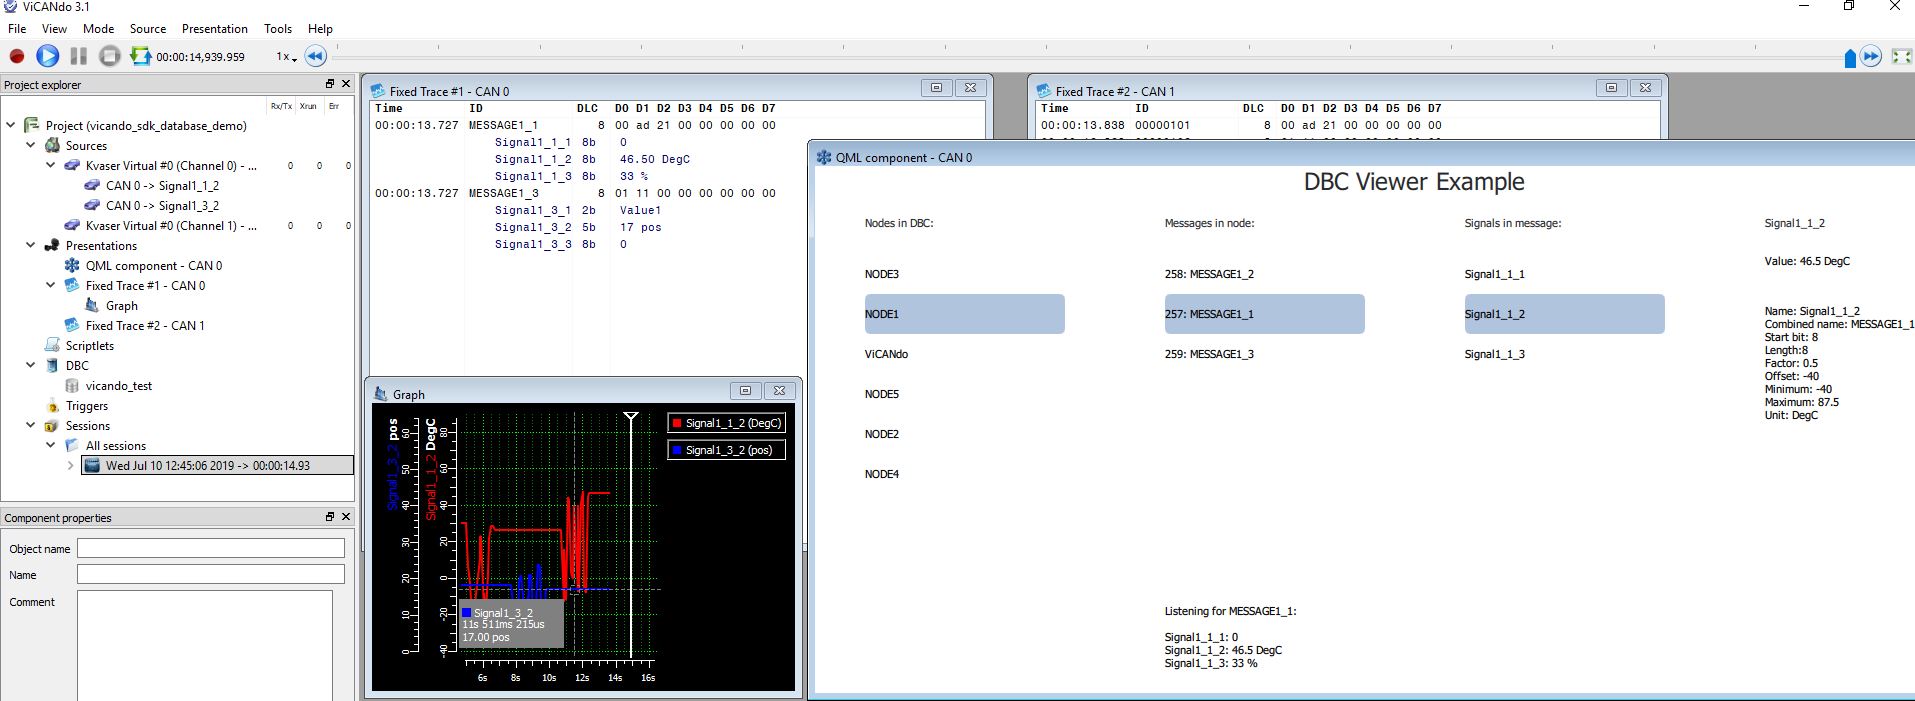
You can use the Tools->Traffic Generator to send the messages. The QML example will display the values of the selected node, message and signal. Download the example project from here: ViCANdo qml DBC access example .
NMEADataListener
Use this component to capture NMEA data from a GPS device.
Properties
Name |
Description |
|---|---|
source |
The GPS source to receive NMEA data from, use main_source or source[0…n] |
filter |
A simple text filter, to only receive NMEA lines matching filter |
Example:
import QtQuick 2.5
import com.zuragon.ViCANdo 1.0

Text {
         id: root_item
         color: "#0000FF"
         width: 500; height: 50
         horizontalAlignment : Text.AlignHCenter
         verticalAlignment : Text.AlignVCenter
         text: "No NMEA data received yet"

         NMEADataListener {
         source: main_source
         filter: "GPRMC"
         onNmeaData: {
                        root_item.text = nmea_line
                }
         }
}
ProjectStateEventListener
Use this component to capture state-changes.
Example:
import QtQuick 2.5
import com.zuragon.ViCANdo 1.0

Rectangle{
 id: main
 width: 700
 height: 360
 ProjectStateEventListener{
                 id: project_state_listener
                 onIdle: {
                         project_state.text = "Idle"
                         project.log("Project Idle " + time_in_us)
                 }
                 onPreparing: {
                         project_state.text = "Preparing"
                         project.log("Project Preparing " + time_in_us)
                 }
                 onArmed: {
                         project_state.text = "Armed"
                         project.log("Project Armed " + time_in_us)
                 }
                 onRecording: {
                         project_state.text = "Recording"
                         project.log("Project Recording " + time_in_us)
                 }
                 onPlaying: {
                         project_state.text = "Playing"
                         project.log("Project Playing " + time_in_us)
                 }
                 onRecordBreak: {
                        // If the project is configured to record continously into new session, each session has a maximum record time. This event will be triggered at the time when the project is
                        // spliting into a new session.
                 }
    }
}
VideoView
The VideoView component allows you to display video from a ViCANdo Video Source in your own QML GUI component.
Properties
Name |
Description |
|---|---|
frameNumber |
The frame number of current video. Read-only access |
autoScaleVideo |
Set this to true if you want the video to be auto-scalled |
centerVideo |
Set to true if you want to position the video to the center |
For example, below QML script will place the video in a rectangle:
Rectangle {
color: "black"
anchors.left: parent.horizontalCenter
anchors.leftMargin: 8
anchors.top: parent.top
anchors.topMargin: 8
anchors.right: parent.right
anchors.rightMargin: 8
anchors.bottom: parent.verticalCenter
anchors.bottomMargin: 4

VideoView {
    id: video_view
    anchors.fill: parent
    source:  project.findObject("video0")
    autoScaleVideo: true
    centerVideo:  true
}
}
You can get the frameNumber by using:
var frame_no = video_view.frameNumber
It is also possible to retrieve more data of the frame by setting up a SourceEventListener:
    SourceEventListener{
    id: video_source_listener
    source: video_view.source
    onDataReceived: {
        project.log(" video listener: "
                    + "frame time: " + data.time
                    + "; frame number: " + data.frameNumber
                    + "; frame width:" + data.frameWidth
                    + "; frame height:" + data.frameHeight);
    }
}