5. Tutorials and Examples
This section lists all the tutorial videos and example projects for you to easier get started. This link is our YouTube Channel. You can subscribe our channel to receive latest ViCANdo videos.
Note
Some projects are not exactly the same projects used in the video. There are some sources that were attached to the specific hardware when we make the project. You need to change the hardware in the project to your own hardware if you want to start working on the example project for your own work.
Watch below demo video to learn how to post-analysis data using Vicando:
5.1 Working with CAN and CAN FD
Example project can be downloaded from: ViCANdo CAN project
Watch below video to learn how to use CAN FD on Vector hardware with Vicando:
5.2 Working with Triggers
Check below video to learn how to work with triggers:
Example project can be downloaded from: ViCANdo CAN triggers project
A multiple trigger example project can be downloaded from here
5.3 Working with GPS and Maps
Check below video to learn how to work with GPS and Maps:
Example project can be downloaded from: ViCANdo GPS and Maps project
5.4 Working with Ethernet
Check below video to learn how to work with Ethernet:
Example project can be downloaded from: ViCANdo Ethernet project
5.5 Working with TCP and UDP Socket
Check below video to learn how to work with TCP and UDP Socket:
Example project can be downloaded from: ViCANdo TCP and UDP Socket
5.6 Forward data between UDP and CAN using QML
From ViCANdo version 2.2.67, it is possible to forward data from UDP to CAN or vise versa, using QML. Download and open UDP to CAN demo
The object names for UDP sources, CAN sources and RSR232 sources inside this demo project are:
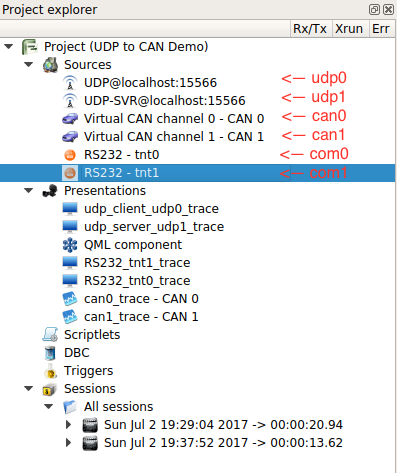
Click on the top left icon “record” and then click on the button “Send to peer”, you will see the data was sent from your UDP client(localhost, in this demo) to UDP server(localhost, in this demo). Looks like this:

Then from the top udp_client_udp0_trace, you will see the UDP client’s port number is 48701 in this connection. In the QML component, configure the host address to “localhost” and host port to “48701” and click on “Send to” button, you will see the data was send from the UDP server to UDP client and CAN sources. The console window shows all the logs. Find the QML script UDP2CAN.qml under folder qml to learn how to send data between UDP and CAN. See the code below:
import QtQuick 2.5
import com.zuragon.ViCANdo 1.0
import QtQuick.Controls 1.4

Rectangle {
    id: rectangle1
    width: 600
    height: 400
    color: "#E0E0E0"


    SourceEventListener {
        source: project.findObject("udp0")

        onDataReceived: {
             project.log("udp0 receives data: " + data.data)
        }
    }


    SourceEventListener {
        source: project.findObject("udp1")

        onDataReceived: {
            project.log("udp1 receives data: " + data.data)

            /* Forward to CAN0 */
            var can0 = project.findObject("can0")

            var id = data.data[0]
            var can_data = data.data.slice(1)
            can0.sendStandard(id,can_data)
            project.log("From udp1 to can0. Data: " + can_data + ". id: " + id)
        }
    }

    SourceEventListener {
        source: project.findObject("can0")

        onDataReceived: {
            project.log("can0 receives data: " + data.data + ". id: " + data.id)
        }
    }

    SourceEventListener {
        source: project.findObject("can1")

        onDataReceived: {
            project.log("can1 receives data: " + data.data + ". id: " + data.id);

            project.log("From can1 to RS232 com0. Data: " + data.data);
            var com0 = project.findObject("com0")
            com0.send(data.data)

            var text = "Hello from can1 to com0"
            com0.sendText(text)
            project.log("From can1 to RS232 com0. Text: " + text);
        }
    }

    SourceEventListener {
        source: project.findObject("com0")

        onDataReceived: {
            project.log("RS232 com0 receives data: " + data.data)
        }
    }

    Button {
        id: send_udp0
        x: 29
        y: 188
        width: 106
        height: 25
        text: qsTr("Send to peer")

        onClicked: {
            var udp0 = project.findObject("udp0")
            var d = [1,2,3,4,5,6,7,8,9]
            udp0.send(d)
            project.log("From udp0 to peer. Data " + d)
        }
    }

    Button {
        id: send_udp1
        x: 180
        y: 188
        width: 98
        height: 25
        text: qsTr("Send to")

        onClicked: {
            var udp1 = project.findObject("udp1")
            var d = [11,22,33,44,55,66,77,88,99]
            udp1.send(d, host_address.text, host_port.text)
            project.log("From udp1 to " + host_address.text + ", port " + host_port.text + ". " + "Data " + d)
        }
    }

    Label {
        id: label_title
        x: 31
        y: 30
        width: 600
        height: 17
        wrapMode: Text.Wrap
        text: qsTr("UDP2CAN QML example: Click Send to peer button to send from UDP Client(udp0) to UDP server(udp1).  Configure and click Send to button, to send from UDP server(udp1) to UDP client and CAN source(can0)  and CAN source(can1).")
    }
    Label {
        id: label
        x: 31
        y: 158
        width: 101
        height: 17
        text: qsTr("Client - udp0")
    }

    Label {
        id: label1
        x: 180
        y: 158
        text: qsTr("Server - udp1")
    }

    TextField {
        id: host_address
        x: 280
        y: 190
        width: 115
        height: 23
        placeholderText: qsTr("Host address")
    }

    TextField {
        id: host_port
        x: 400
        y: 190
        width: 65
        height: 23
        placeholderText: qsTr("Host port")
    }


}
To learn how to create your own QML component, please follow this ViCANdo QML API documentation
5.7 Sending CAN message using QML
ViCANdo allows you to use QML component to access all the sources. Download the ViCANdo qml send CAN example and learn how to use QML component to send CAN message via the associated CAN source.
Open the example project and press “Record” button on the top left corner to start. The QML component looks like this:
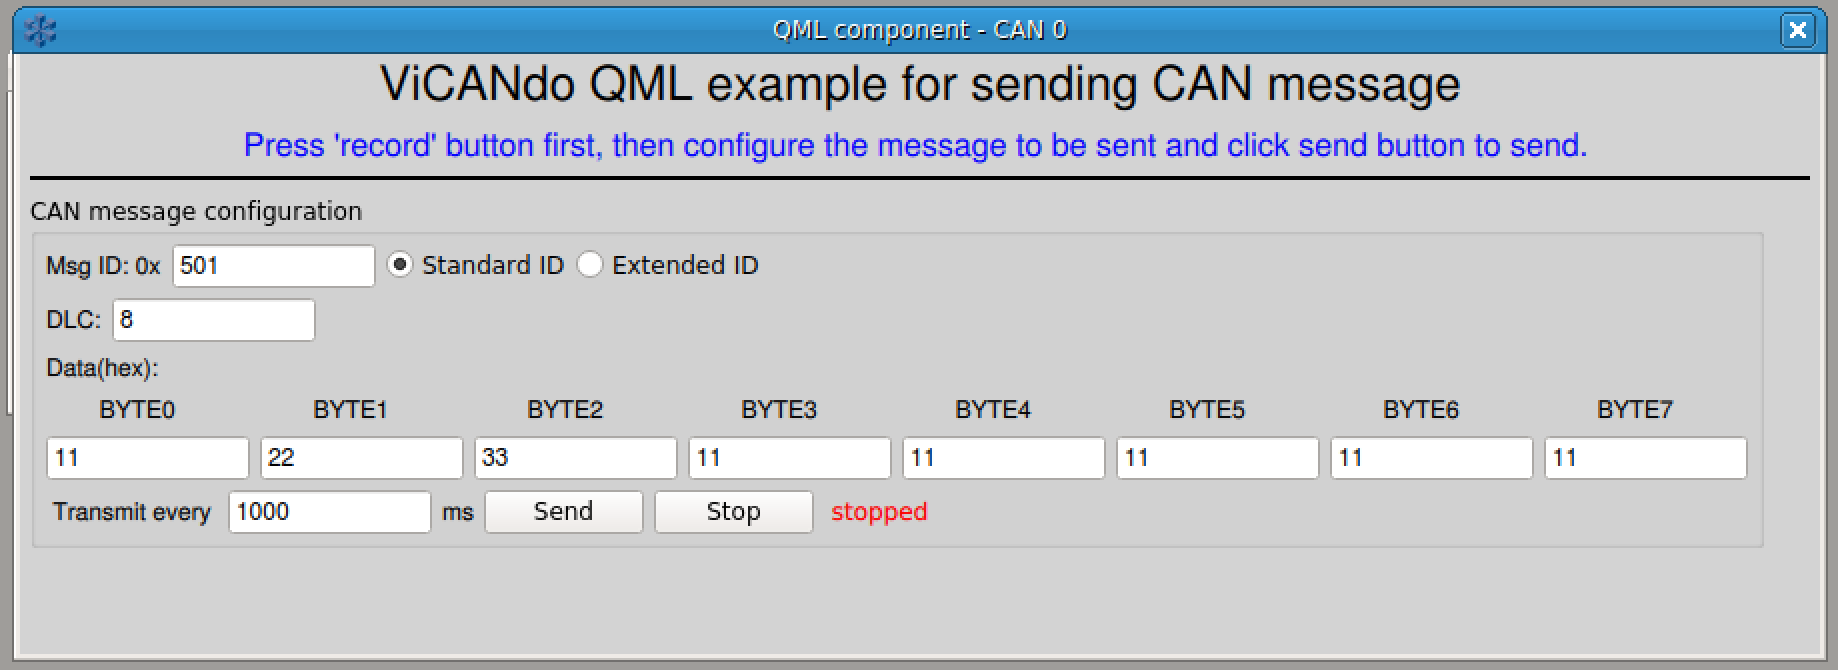
It uses the “Virtual CAN 0” source, whose object name was set to “can0” to send the configured message periodically. The QML source code is under qml folder inside the example project archive. It is available also here:
import QtQuick 2.5
import com.zuragon.ViCANdo 1.0
import QtQuick.Extras 1.4
import QtQuick.Controls 1.4
import QtQuick.Layouts 1.3
import QtQuick.Controls.Styles 1.4


Rectangle {
        width: 900
        height: 300
        color: "lightgrey"
        id: qml_send_can_example
        visible: true

        Text{
            id: title
            text: " ViCANdo QML example for sending CAN message "
            font.family: "Helvetica"
            anchors.topMargin: 15
            anchors.horizontalCenter: parent.horizontalCenter
            font.pointSize: 18
        }

        Text{
            id: instruction
            color: "blue"
            text: "Press 'record' button first, then configure the message to be sent and click send button to send. "
            font.family: "Helvetica"
            anchors.top: title.bottom
            anchors.topMargin: 5
            anchors.horizontalCenter: parent.horizontalCenter
            font.pointSize: 12
        }


        Rectangle {
            id: line_separator_1
            height: 2
            color: "#000000"
            anchors.top: instruction.bottom
            anchors.topMargin: 5
            anchors.right: parent.right
            anchors.rightMargin: 5
            anchors.left: parent.left
            anchors.leftMargin: 5
        }

        GroupBox {
            id: group_box_config
            title: "CAN message configuration"
            anchors.top: instruction.bottom
            anchors.topMargin: 15
            anchors.left: parent.left
            anchors.leftMargin: 5

            RowLayout {
                id: first_row
                Text{
                    id: tx__id_label
                    text: "Msg ID: 0x"
                    font.family: "Helvetica"
                }
                TextField{
                    id: tx_id
                    text: "501"
                    font.family: "Helvetica"
                }

                ExclusiveGroup { id: id_type_group }
                        RadioButton {
                            id: standard_id
                            text: "Standard ID"
                            checked: true
                            exclusiveGroup: id_type_group
                        }
                        RadioButton {
                            id: extended_id
                            text: "Extended ID"
                            exclusiveGroup: id_type_group
                        }

            }

            RowLayout {
                id: second_row
                anchors.top: first_row.bottom
                anchors.topMargin: 5
                Text{
                    id: tx_dlc_label
                    text: "DLC:"
                    font.family: "Helvetica"

                }
                TextField{
                    id: tx_dlc
                    text: "8"
                    font.family: "Helvetica"
                }
            }

            RowLayout{
                id: third_row
                anchors.top: second_row.bottom
                anchors.topMargin: 5
                Text{
                    id: data_label
                    text: "Data(hex):"
                    font.family: "Helvetica"
                }
            }
            RowLayout{
                id: fourth_row
                anchors.top: third_row.bottom
                anchors.topMargin: 5
                Text{
                    id: byte0_label
                    text: "        BYTE0           "
                    font.family: "Helvetica"
                }
                Text{
                    id: byte1_label
                    text: "        BYTE1           "
                    font.family: "Helvetica"
                }
                Text{
                    id: byte2_label
                    text: "        BYTE2           "
                    font.family: "Helvetica"
                }
                Text{
                    id: byte3_label
                    text: "        BYTE3           "
                    font.family: "Helvetica"
                }
                Text{
                    id: byte4_label
                    text: "        BYTE4           "
                    font.family: "Helvetica"
                }
                Text{
                    id: byte5_label
                    text: "        BYTE5           "
                    font.family: "Helvetica"
                }
                Text{
                    id: byte6_label
                    text: "        BYTE6           "
                    font.family: "Helvetica"
                }
                Text{
                    id: byte7_label
                    text: "        BYTE7           "
                    font.family: "Helvetica"
                }
            }
            RowLayout{
                id: fifth_row
                anchors.top: fourth_row.bottom
                anchors.topMargin: 5
                TextField{
                    id: byte0
                    text: "11"
                    font.family: "Helvetica"
                }
                TextField{
                    id: byte1
                    text: "22"
                    font.family: "Helvetica"
                }
                TextField{
                    id: byte2
                    text: "33"
                    font.family: "Helvetica"
                }
                TextField{
                    id: byte3
                    text: "11"
                    font.family: "Helvetica"
                }
                TextField{
                    id: byte4
                    text: "11"
                    font.family: "Helvetica"
                }
                TextField{
                    id: byte5
                    text: "11"
                    font.family: "Helvetica"
                }
                TextField{
                    id: byte6
                    text: "11"
                    font.family: "Helvetica"
                }
                TextField{
                    id: byte7
                    text: "11"
                    font.family: "Helvetica"
                }

            }
            RowLayout{
                id: sixth_row
                anchors.top: fifth_row.bottom
                anchors.topMargin: 5

                Text{
                    id: tx_interval_label
                    text: " Transmit every "
                    font.family: "Helvetica"
                }

                TextField{
                    id: tx_interval
                    text: "1000"
                    font.family: "Helvetica"
                }

                Text{
                    id: tx_interval_ms_label
                    text: "ms"
                    font.family: "Helvetica"
                }
                Button {
                    id: send_button
                    text: "Send"
                    onClicked: {
                        timer.start()
                    }
                }
                Button {
                    id: stop_button
                    text: "Stop"
                    onClicked: {
                        timer.stop()
                    }
                }
                Text{
                    id: status_label
                    color: timer.running ? "green":"red"
                    text: timer.running ? " sending..." : " stopped"
                }
            }

        }

        function getCANData() {
            var dlen = parseInt(tx_dlc.text)
            var data = []
            var values = [ byte0.text,
                           byte1.text,
                           byte2.text,
                           byte3.text,
                           byte4.text,
                           byte5.text,
                           byte6.text,
                           byte7.text ]

            for ( var i = 0; i < dlen; ++i ) {
                data[i] = parseInt(values[i], 16)
            }
            return data;
        }

        Timer {
            id: timer
            interval: parseInt(tx_interval.text)
            running: false
            repeat: true
            onTriggered:{

                var id = parseInt(tx_id.text, 16)
                var data = getCANData()

                // Send the message every selected ms
                if( standard_id.checked){
                    project.findObject("can0").sendStandard(id, data)
                }else{
                    project.findObject("can0").sendExtended(id, data)
                }
                project.log("Send msg --> id(dec): " + id + "   data(dec):  [" + data + "]")

            }
        }

        // For listenning to CAN messages received by this source "can0"
        SourceEventListener {
            id: listen_to_can_msg
            source: project.findObject("can0") // can0 is the first CAN source
            //dbc: project.findObject("object_name_of_my_dbc")
            // filter: ["msgName1","msgName2"]
            onFrameDataReceived: {
                project.log("Source can0 Rx msg id: " + _data.id + " dlc: " + _data.dlc + " data: " + _data.data)
            }
        }

        // For listenning to ViCANdo project state change.
        ProjectStateEventListener {
            id: project_state_listener

            onIdle: {
               project.log("Project Idle " + " at time " + time_in_us + " us")
            }

            onPreparing: {
               project.log("Project Preparing" + " at time " + time_in_us + " us")
            }

            onArmed: {
                project.log("Project Armed " + " at time " + time_in_us + " us")
            }

            onRecording: {
                project.log("Project Recording " + " at time " + time_in_us + " us")
            }

            onPlaying: {
                project.log("Project Playing " + " at time " + time_in_us + " us")
            }
        }

}
5.8 Working with MobileEye
MobileEye is a vision-based advanced driver-assistance system that provides warnings for collision prevention and mitigation. With a MobileEye database file, you can analyze the MobileEye signals from the CAN bus directly in ViCANdo. Or if you want, you can also create a QML component to present the signals in a better way.
The example project can be downloaded from: ViCANdo MobileEye project , inside the project, the source CAN 1 channel is connected to the same CAN bus where MobileEye is connected to. The mobileEyeExample.qml was created for this project. “can1” is the object name of the CAN 1 source in ViCANdo, “mobileeye_ftp_all_protocol” is the object name of the database file “mobileeye_ftp_all_protocol.dbc” in ViCANdo. Just play the session and you will see the QML component like this:
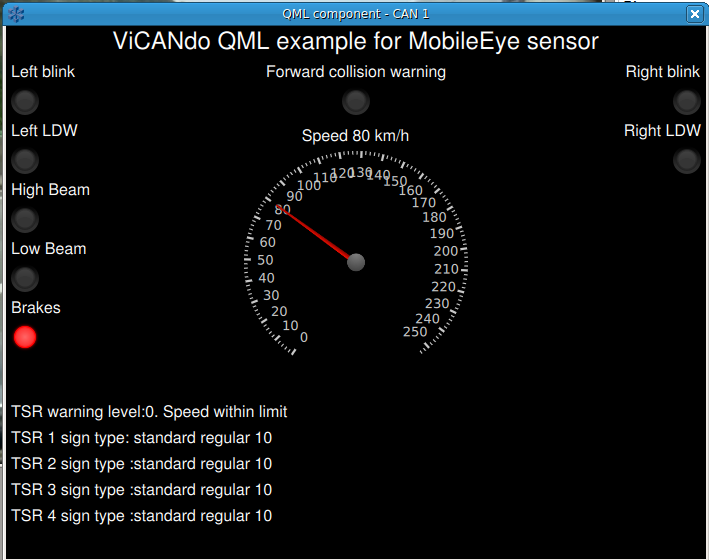
The components are connected to the signals specified inside the database file. To learn how to create your own QML component, please follow this ViCANdo QML API documentation
Note
The MobileEye database file and the protocol specification inside the example project package were downloaded from MobileEye CAN output specification and MobileEye database file
5.9 Working with Neurosky mindwave headset
Neurosky is a leader who provides EEG & ECG Biosensor Solutions. The MindWave Mobile headset can be paired with PC or phone via bluetooth. It can be recognized as a RS232 source in ViCANdo.
Below screenshot is an example configuration and QML visualization(contact us for this option) of the RS232 source which is used for neurosky headset:
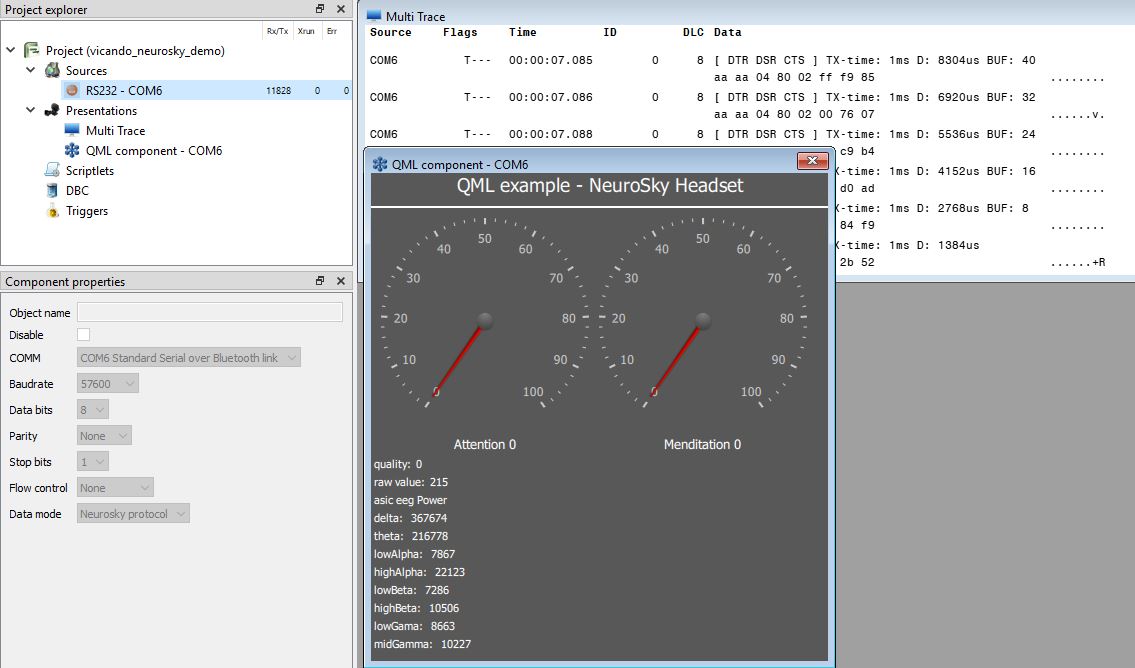
It is also possible to export decoded Neurosky data to CSV format for post analysising with other tools.
Note
On Windows OS, you may need to run the Neurosky’s ThinkGear Connector at the background. Read their manual for more information.